Introduction #
Eventin’s automation feature provides an advanced and flexible way to manage event-related email communications. The default Eventin email system, which sends fixed emails for RSVP, purchase confirmation, and reminders, the automation feature allows you to create customized email flows based on specific conditions and user actions.
With automation enabled:
- You can customize emails based on various event types, user roles (such as attendee, customer, or admin), and time-based triggers.
- You have full control to edit, design, and personalize emails using built-in templates or create new ones from scratch.
- This ensures that emails are timely, relevant, and consistently branded, providing an enhanced experience for event participants.
Note: When Email Automation is enabled, Eventin’s default email system (under Eventin > Settings > Email) will be automatically disabled, ensuring there is no conflict or duplicate emails.
Prefer a video walkthrough 🎥 ? #
👉 Watch this quick tutorial on how to use automation workflows in Eventin.
Required Plugins #
To enable automation, you will need the following:
- Eventin (Free)
- Eventin (Pro)
Make sure both the main plugins are installed and activated.
How to Enable the Automation Add-on #
- Navigate to Eventin > Addons from your WordPress dashboard.
- Locate the Automation Add-on.
- Click the toggle switch to enable it.
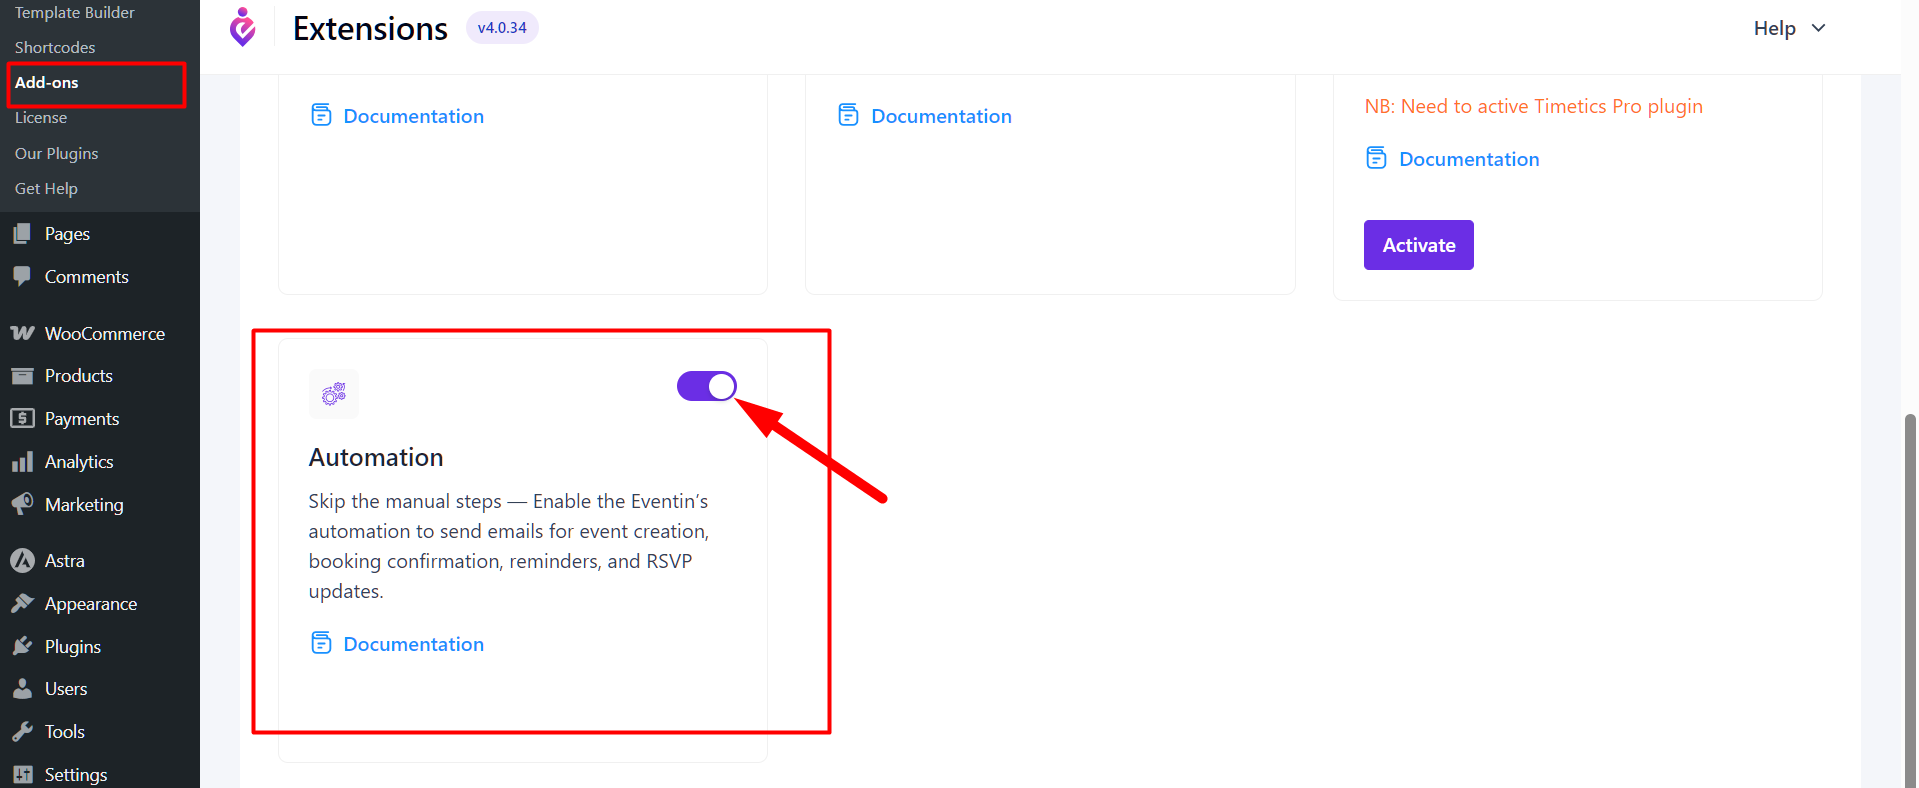
Once enabled, a new Automation menu will appear in your Eventin dashboard.
How to Access and Manage Email Automations #
To get started, navigate to Eventin > Automation from your WordPress dashboard. There, you will find a few ready-made automation templates, including:
- Event Ticket Purchase
- RSVP Email
- Event Reminder Email
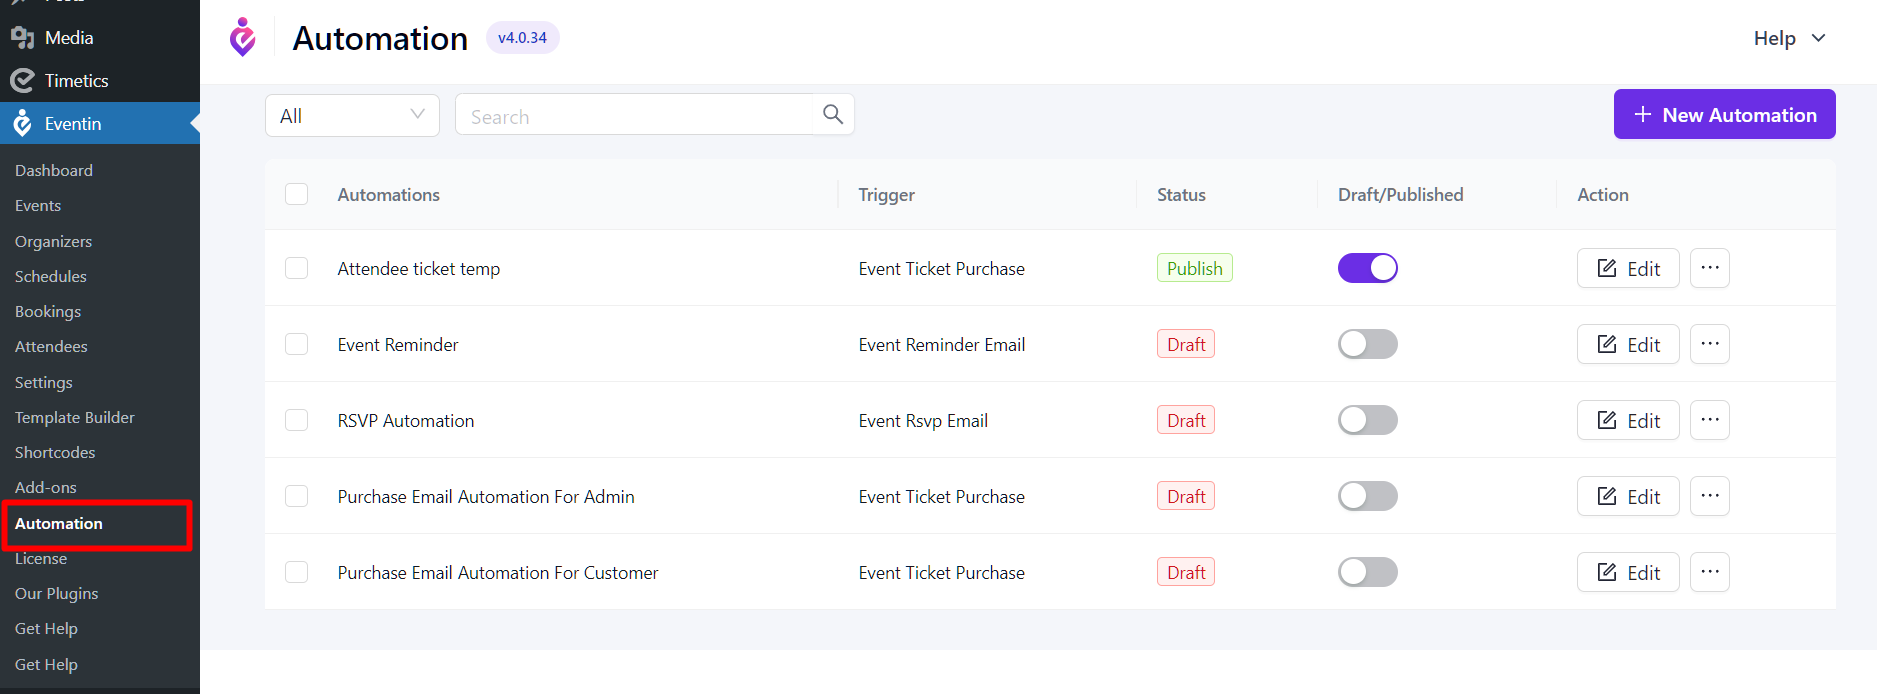
These templates are fully customizable, allowing you to modify the content, branding, and conditions as needed. Additionally, if you prefer to build your own flow, you can click the “Add New” button to create a custom automation from scratch.
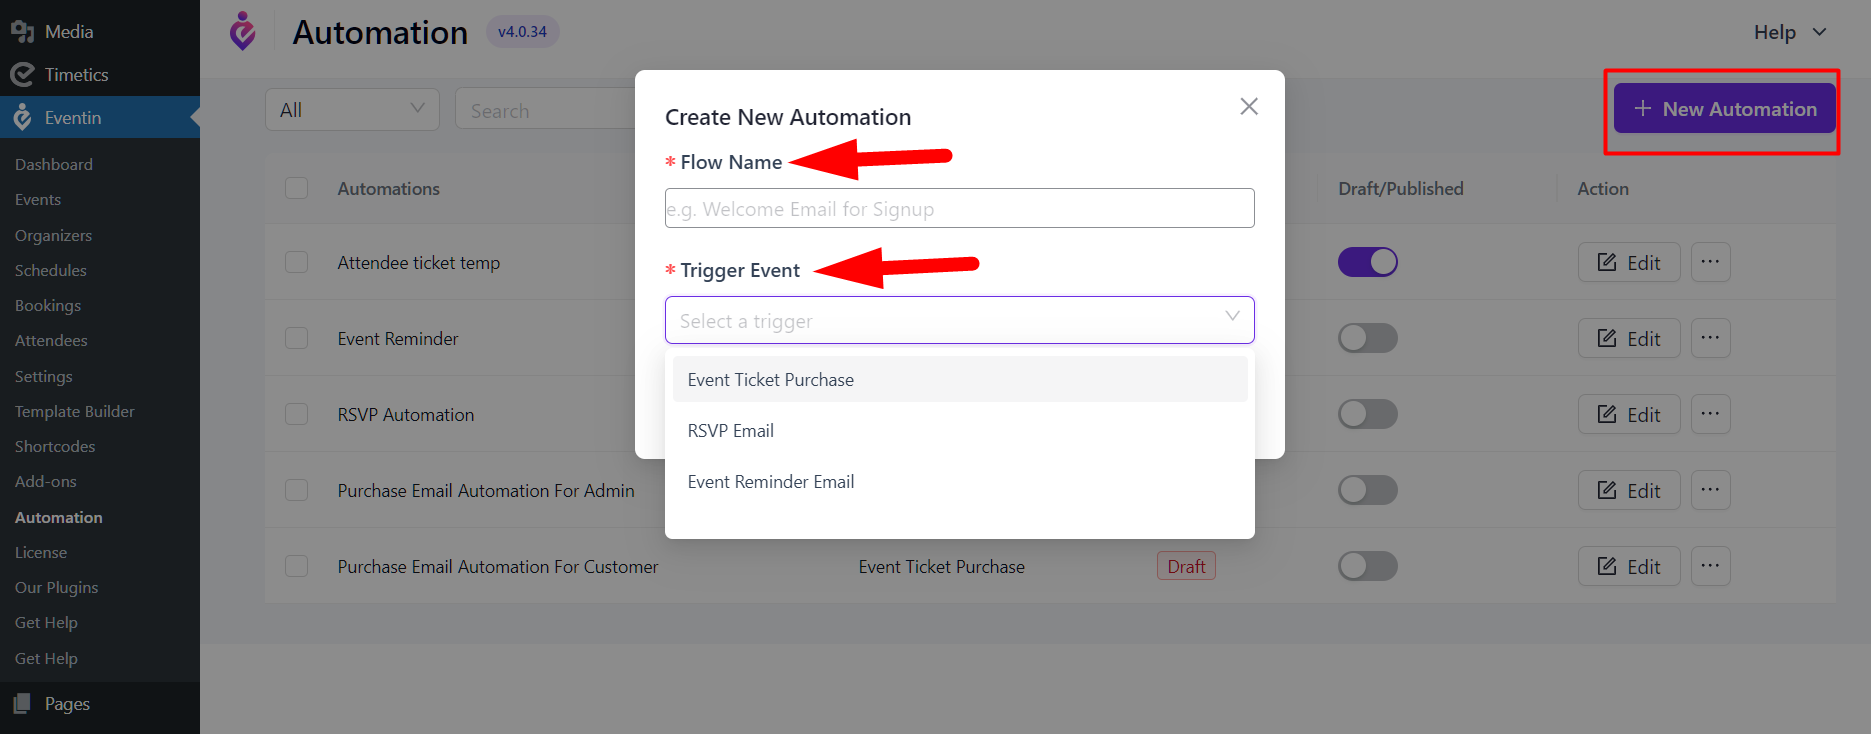
How to Create a New Automation #
To create a new automation, go to Eventin > Automation and click on the “+ New Automation” button. A pop-up will appear where you need to enter a name for your automation flow and select a trigger event from the dropdown menu.
Available trigger options include:
- Event Ticket Purchase
- RSVP Email
- Event Reminder Email
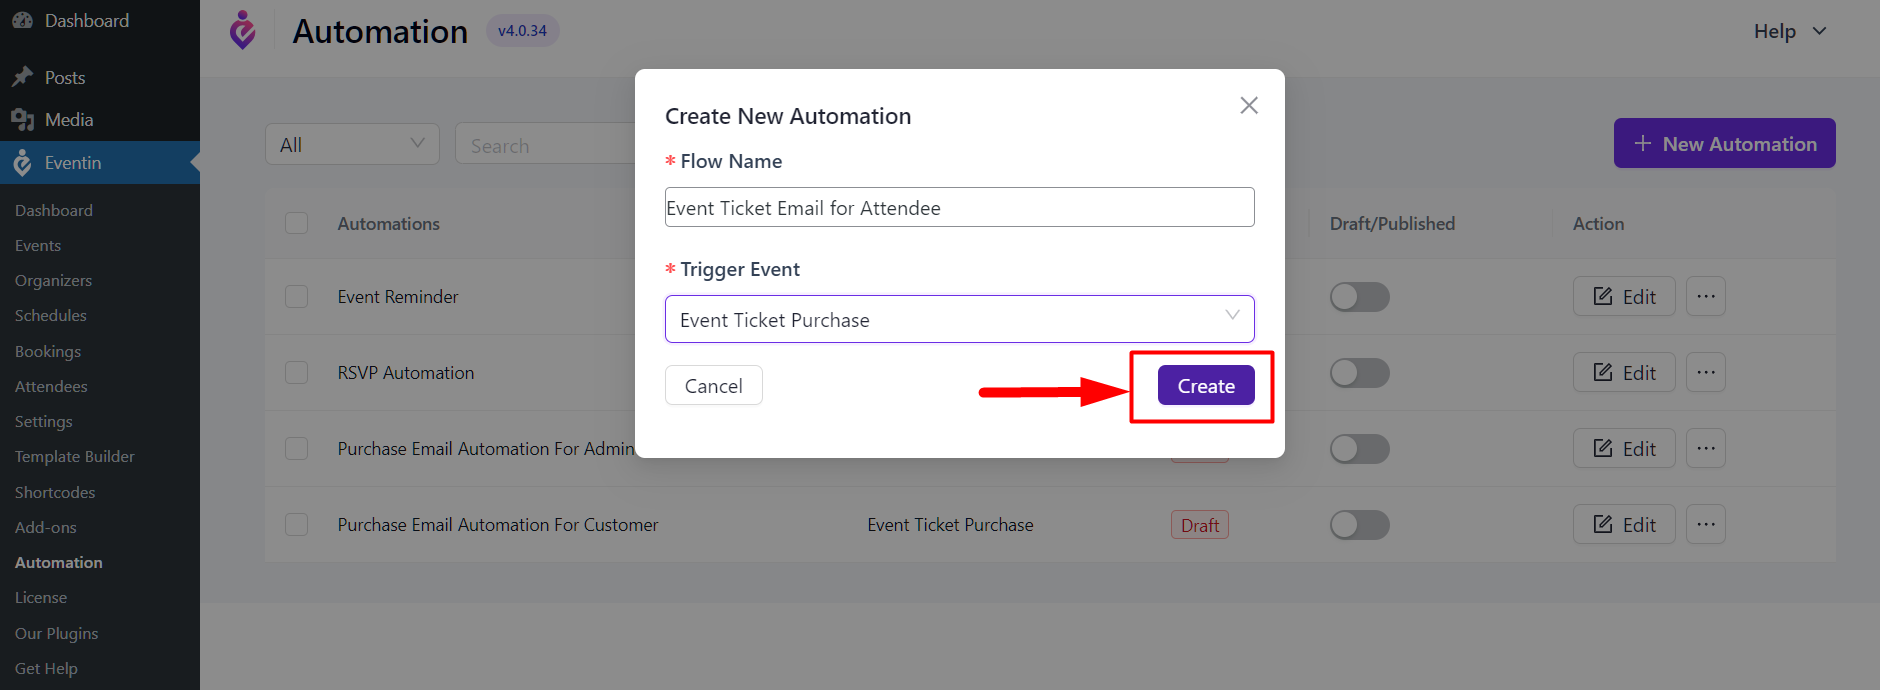
After selecting your desired trigger, click on the “Create” button. You will then be redirected to the Automation Builder page, where you can configure the actions and customize your automation flow. By default, you’ll see two blocks:
- Trigger Event – This is the starting point that defines when the automation should begin (e.g., when someone purchases a ticket).
- End Automation – This marks the end of the automation flow.
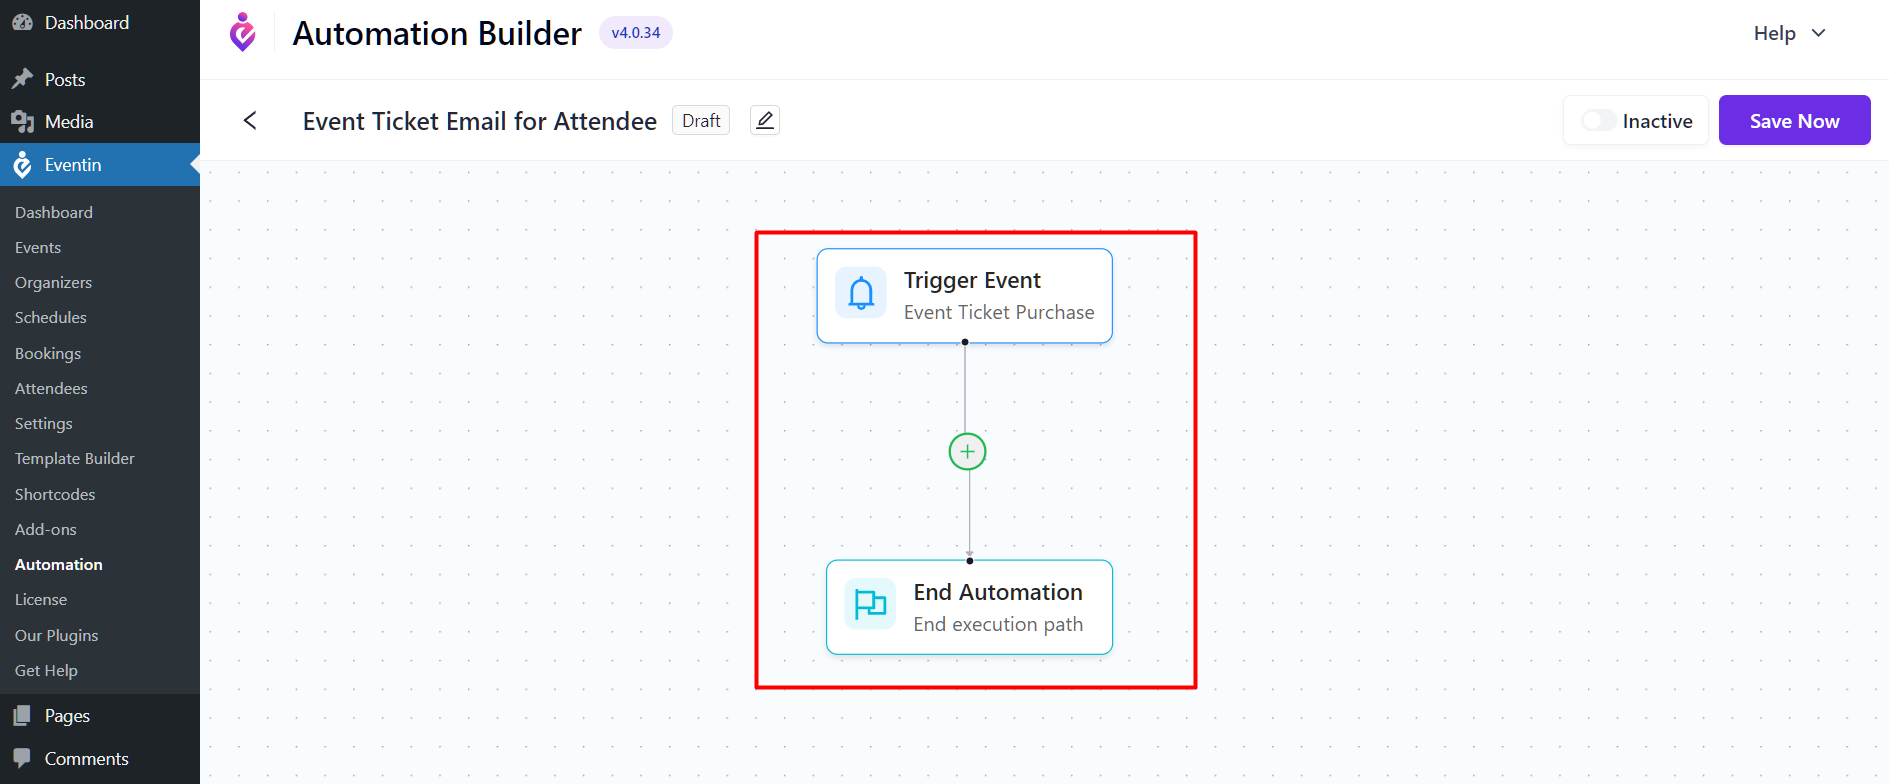
To define what happens between these two steps, click on the “+” icon between the blocks. This will open the “Add New Node” panel where you can choose between two options: Action or Condition.
- Action lets you perform tasks like sending emails or adding time delays after the trigger occurs.
- Condition allows you to set rules based on specific criteria.
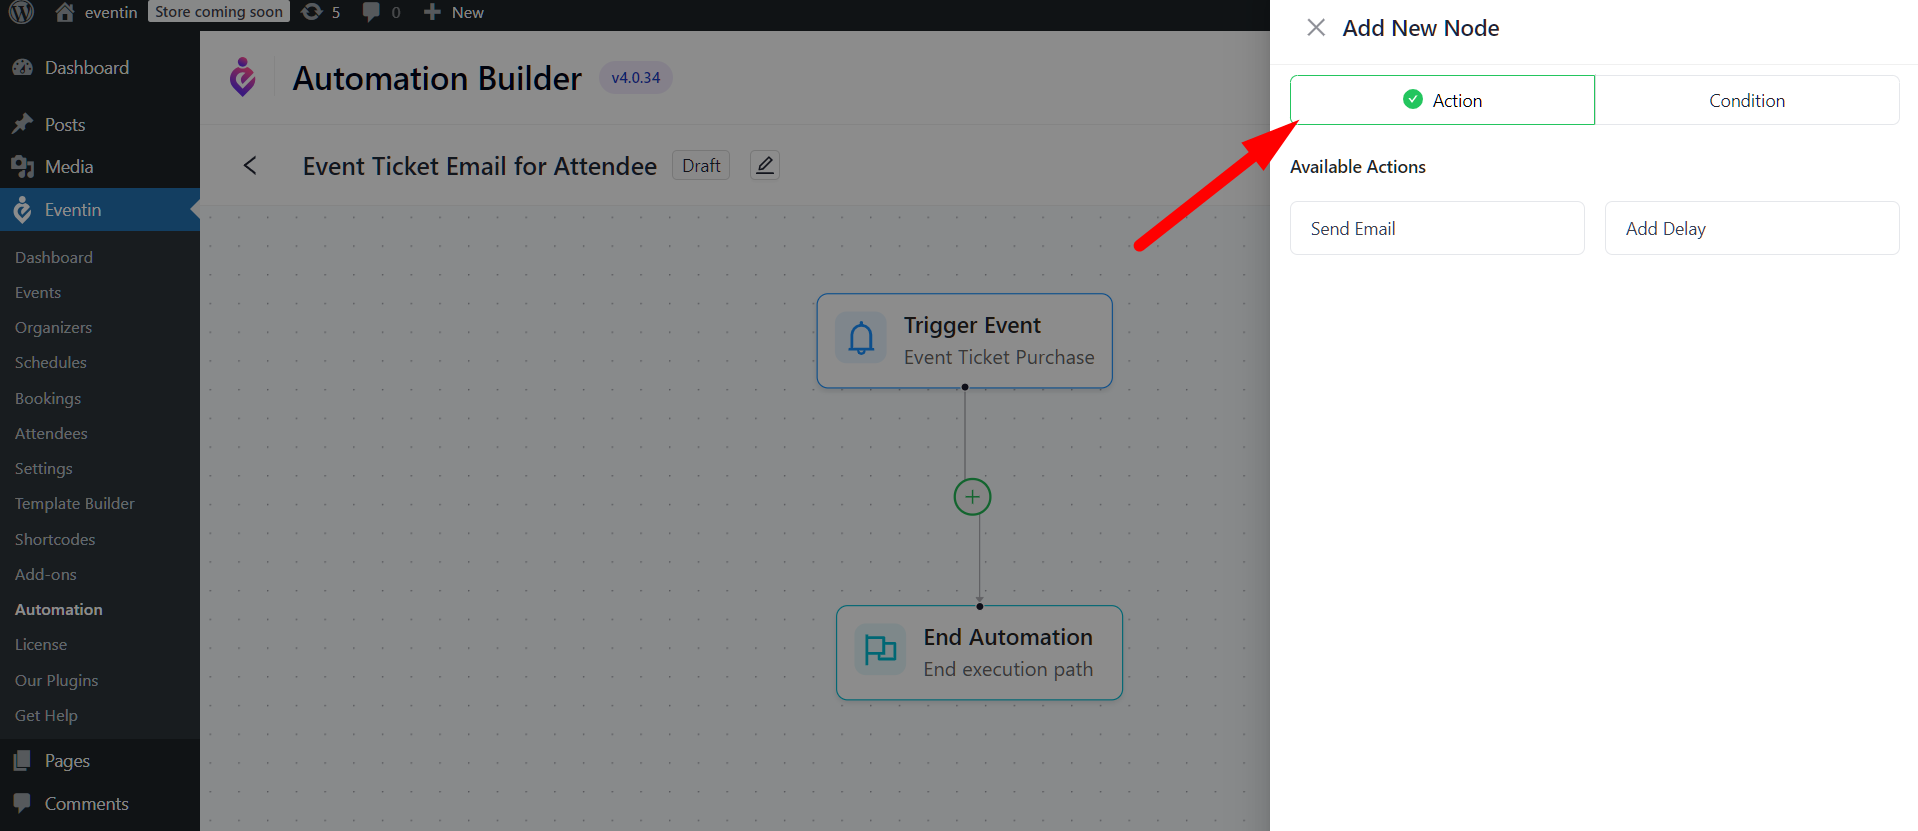
Adding an Action in Automation Flow #
- Send Email – Sends a customized email to a specific recipient based on the trigger.
- Add Delay – Pauses the flow for a defined time period before the next action is executed. This is useful for reminder emails or follow-ups.
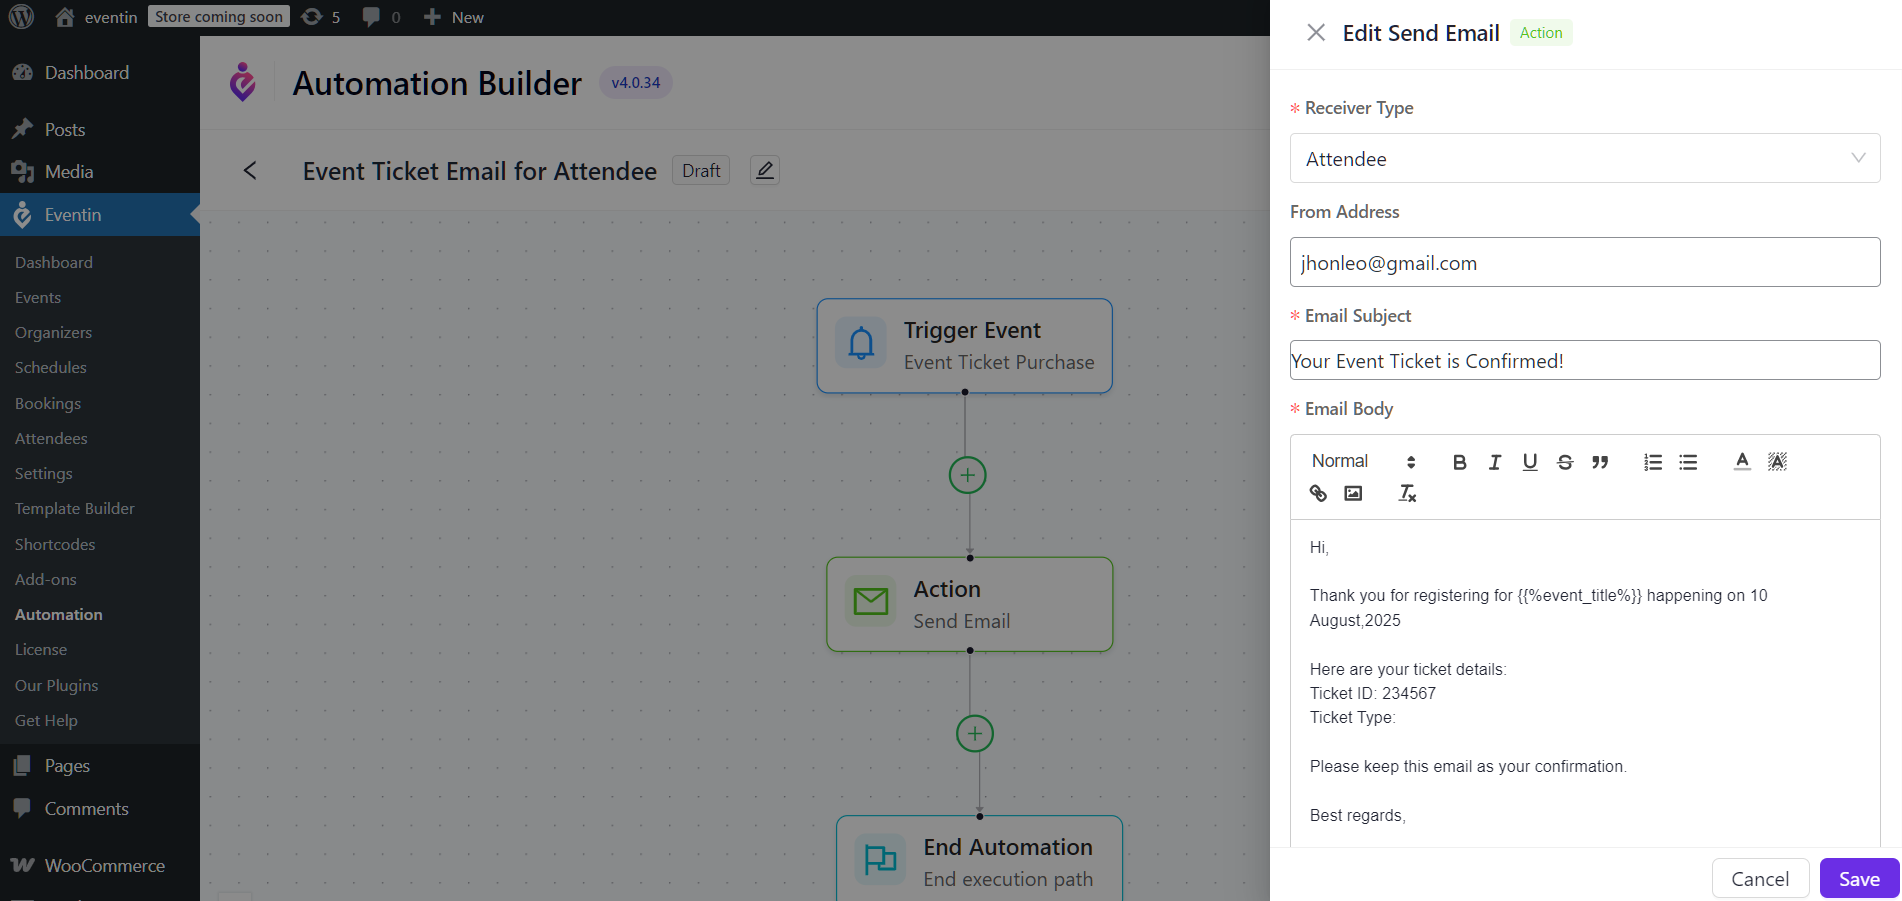
Configuring the “Send Email” Action #
When you choose Send Email, a configuration form will appear with the following fields:
- Receiver Type: Define who the email should go to — such as the Customer, Attendee, or Admin.
- From Address: Set the sender’s email address that will appear in the recipient’s inbox.
- Email Subject: The subject line of your email.
- Email Body: Write the content of the email using plain text or HTML. You can make it dynamic by using variables.
- Variables for Email Body Content: A list of predefined dynamic tags (e.g., {%site_name%}{%site_link%}{%site_logo%}{%event_title%}{%event_location%}{%event_time%}{%event_date%}) that automatically populate specific event data into the email.
After filling out all necessary fields, click the “Save” button to apply the email action to your automation flow. This step ensures that your automation is active and ready to trigger when the defined condition is met.
In the Automation Builder, all steps (like triggers, actions, and conditions) appear as draggable nodes. You can rearrange their position by simply dragging and dropping them within the flow.
To remove a node, hover over it and click the trash icon. This allows you to edit and organize your automation easily.
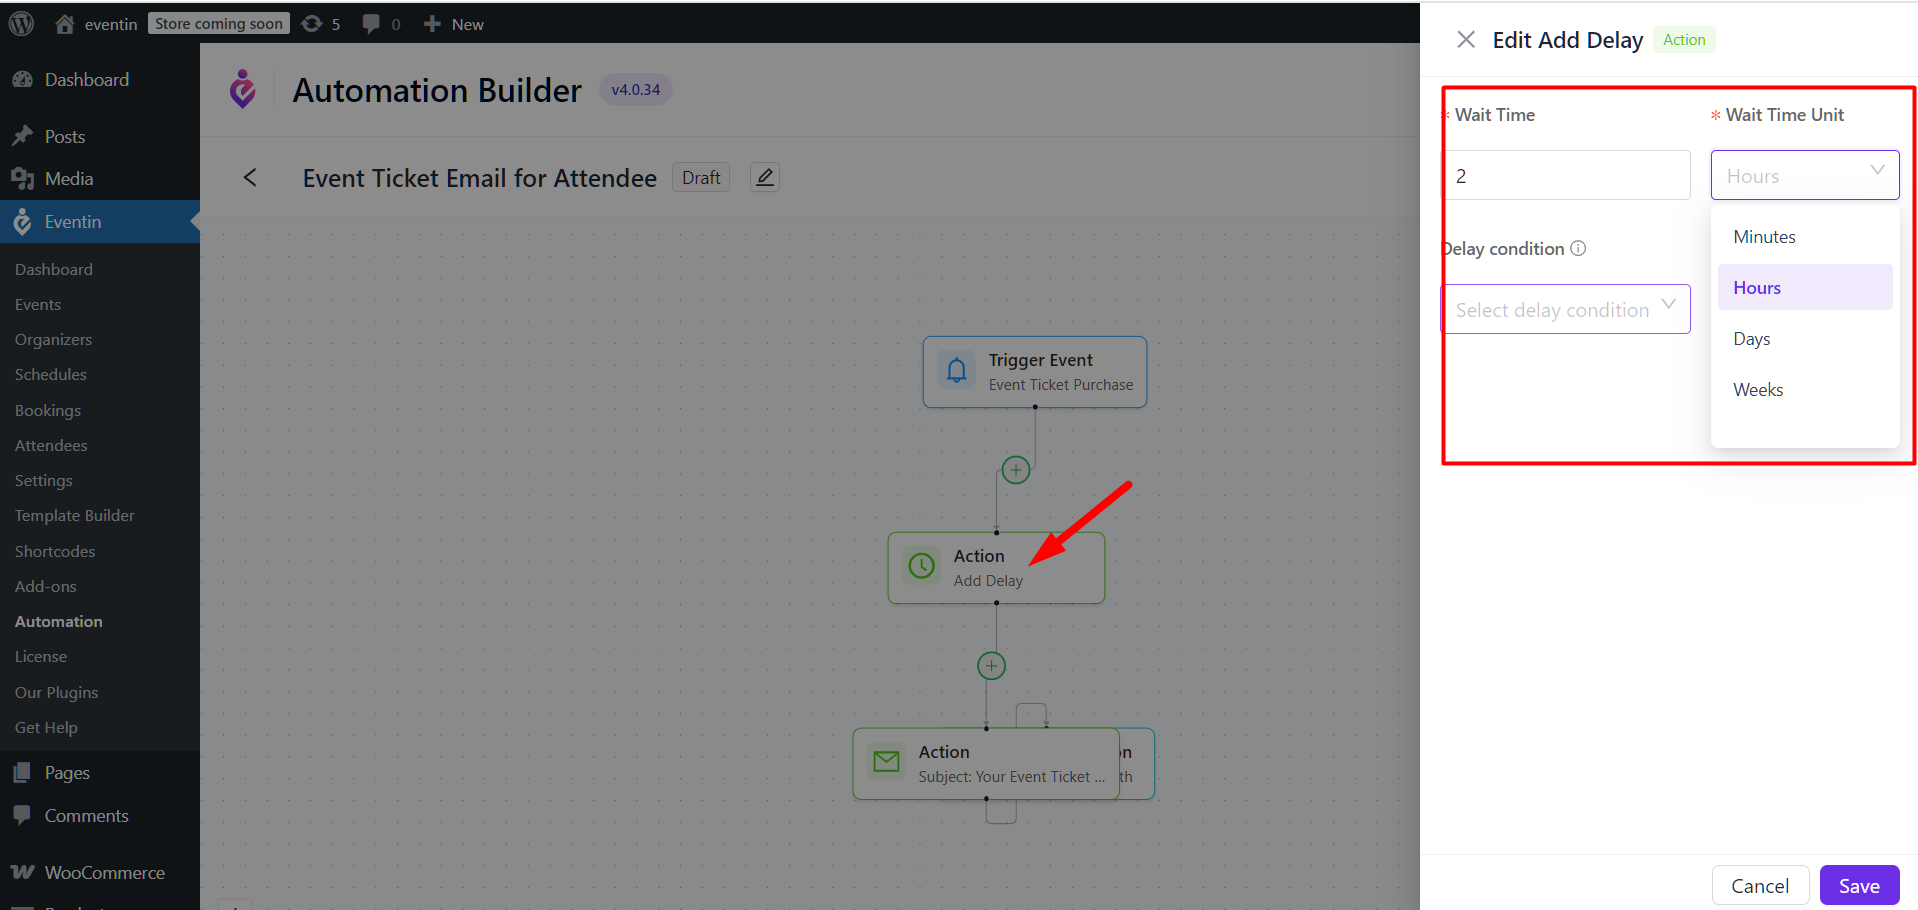
Configuring the “Add Delay” Action #
In the Automation Builder, you can insert a time gap between actions using the Add Delay action. This helps schedule follow-up emails or actions after a specific duration.
To set it up, click the “+” button between nodes and choose Add Delay. A panel will appear with the following fields:
- Wait Time: Enter the number value for the delay (e.g., 2).
- Wait Time Unit: Select the unit—Minutes, Hours, Days, or Weeks.
- Delay Condition (optional): Choose a condition if you want the delay to apply only in specific cases.
Click Save to add the delay block to your flow. The next action will run only after the defined time passes.
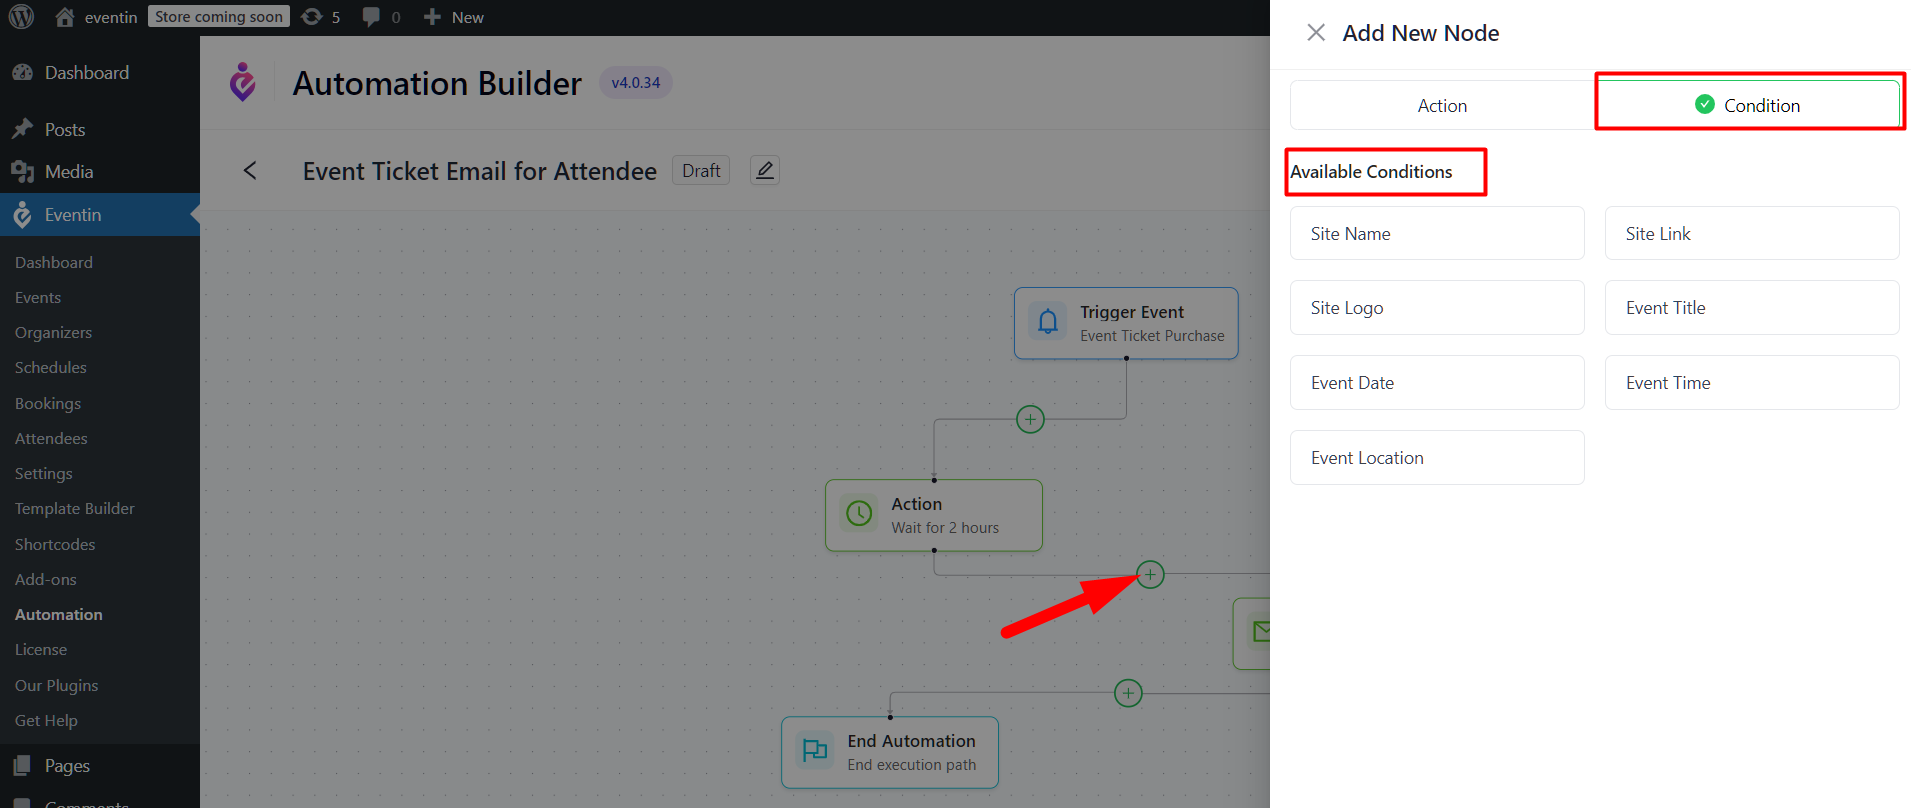
Adding a Condition in Automation Flow #
Conditions allow you to control who receives an action based on event-specific values. You can use conditions to ensure that only certain users (e.g., attending a specific event) receive a particular email or trigger.
- Inside the Automation Builder, click the “+” icon and choose Condition from the options.
- A panel titled “Available Conditions” will appear. You’ll see several condition types, including:
- Site Name – Filters based on the WordPress site name
- Site Link – Filters by the site’s URL
- Site Logo – Based on logo metadata
- Event Title – Filters based on the name of the event
- Event Date – Target based on event schedule
- Event Time – Match by event time
- Event Location – Target events by location
Click on Event Title to apply a condition that filters users based on the name of the event. You will see an operator such as “=”, which means the system will check for an exact match.
If you set the Event Title to "BITPA Conference Event" and the operator to "=", Only the attendees of that exact event will receive the next action (such as an email).
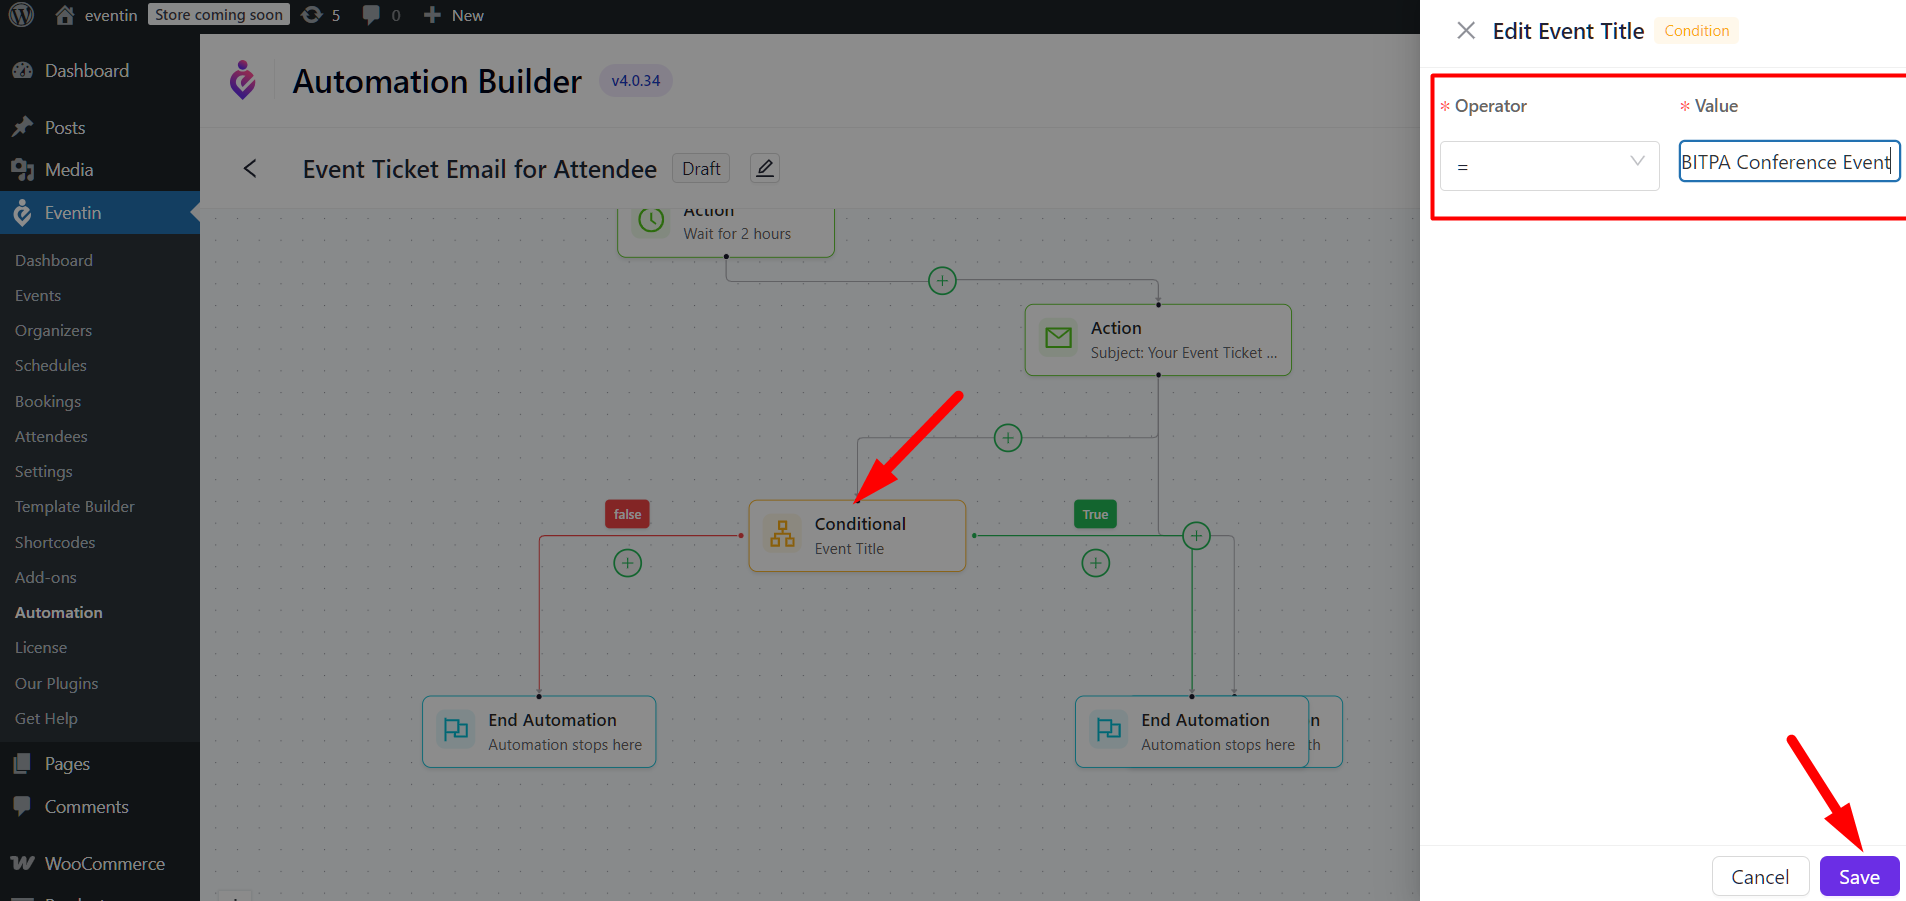
After setting your condition, click Save to apply it to your automation.
Save and Activate the Automation #
After building your automation, click “Save Now” to save the flow.
Then click the Inactive toggle to switch it to Active. Your automation is now live and will run based on the trigger.

At this stage, you can configure RSVP emails or Reminder emails within this process.
FAQ #
1. Do I need Eventin Pro for the Automation feature?
No. Only Eventin (Free) needs to be activated.
2. What happens to the default Eventin email system when Automation is enabled?
It will be automatically disabled to prevent duplicate or conflicting emails.
3. Can I delay sending emails after a trigger?
Yes. The Add Delay action allows you to pause the flow for minutes, hours, days, or weeks.
4. Do I need coding skills to use the Automation Builder?
No. It’s a drag-and-drop interface—no coding required.
Conclusion #
The Eventin Email Automation Workflow Builder gives you complete control over your event communications. By replacing the fixed default email system with a fully customizable automation builder, you can create tailored email flows that match your event needs. From personalized ticket confirmations to targeted reminders, the drag-and-drop interface makes it easy to design professional, timely, and relevant emails without technical complexity.
Whether you’re managing small gatherings or large-scale conferences, Eventin’s automation ensures your attendees, customers, and admins receive the right information at the right time, boosting engagement and delivering a seamless event experience.


