Skip to content
Documentation for Plugins
  • Home
  • Support
  • Plugin Docs
Popular Search ticketemailqr codetranslatelocation

Eventin

Event
  • Single Event
  • Event Single Page with Elementor
  • Event Single Page with Oxygen Builder Using Shortcode
  • Event Attendee
  • Adding Attendees Manually
  • Recurring Event
  • QR Code for Event Ticket Management
  • WooCommerce Coupon for Events
  • Event Speaker & Organizer
  • Event location
  • Event Email Settings
  • Event Schedule
  • Front-end Event Submission (1st Phase)
  • Multivendor Event Marketplace.
  • Certification for Attendee
  • Embeddable Script
  • Webhooks
General Settings
  • General Settings
  • Plugin Installation
  • License
  • Purchaser Dashboard
  • User Roles and Permissions
  • Shortcodes
  • Min/Max Quantity Limit
  • Registration and Ticket Selling
  • WooCommerce Deposits Extension Compatibility
  • Translation
  • Plugin Uninstallation
  • Get Support
Integration
  • DIVI Builder Integration
  • FluentCRM Integration
  • Groundhogg Integration
  • Calendar Integration (Google, Apple etc)
  • Pabbly Integration
  • Twilio SMS Integration
  • Zapier Integration
  • BuddyBoss Integration
  • Zoom Module
Others Settings
  • Calendar View
Payment Type
  • WooCommerce
  • Stripe
Templates
  • Event Template Override
  • Speaker Template Override
  • Archive Page Override

Timetics

Bookings
  • New Booking for Meeting
  • Customer List
General Settings
  • My Profile
  • General Settings for Timetics
Getting Started
  • Introduction
  • Installing / Updating Timetics
Integrations
  • Google Meet/Calendar Integration
Meetings
  • One-on-One Meeting
  • One-on-Many Meeting
  • Collective Meeting
  • Frontend Meeting Display
Notifications
  • Email Notification
Payment Type
  • Stripe
Staff List
  • Add New Staff/Host

WPCafe

  • Plugin Installation
  • WpCafe Shortcode
  • Multivendor Addon
  • Translation
  • WpCafe Elementor Widgets
  • Searching Products with Pickup/Delivery
  • Oxygen Builder Elements
  • User Roles and Permissions
  • Plugin Uninstallation
  • Theme Compatibility
  • Get Support
  • License
Delivery Module
  • General
  • Add Food Store’s Location at Google Map
  • Google autocomplete address in the checkout
  • Minimum order amount to place order
Food Ordering
  • General Settings For Location
  • Add New Food Menu
  • Food Ordering with QR code
  • Add Food Category and Tag
  • Minicart
  • Tipping
  • Discount
  • Special Menus
  • Live Order
  • Pickup
  • Delivery
  • Order Bumps
  • Product Addons
  • Product Addons for Vendor
General settings
  • General Settings for Date and Time
  • Slug Change
Integrations
  • FluentCRM Integration
  • Zapier Integration
  • Pabbly Integration
  • Food delivery ( Ship day ) plugin integration
  • Twilio SMS Integration
  • Thermal Printer Integration
  • WooCommerce Clover POS Integration
  • Loyalty Program Points & Rewards for Food Orders
Reservation
  • General Settings for Reservation
  • Form Customization
  • Notification Email
  • Schedule
  • Email Settings
  • Reservation with Food Ordering (PRO)
  • Visual Table Selection
Style Settings
  • Style Settings
WPCafe APP
  • Protected: App Settings
  • Protected: Delivery Time Update
  • Protected: Delivery Man
  • Home
  • Docs
  • Eventin
  • Integration
  • DIVI Builder Integration

DIVI Builder Integration

Eventin now supports DIVI, the most popular WYSIWYG builder. Design with DIVI to create the perfect event management website. In order to use DIVI, you will need to have the following plugins installed on your WordPress site:

  1. Eventin
  2. Eventin Divi Addons
  3. WooCommerce (If you want to sell tickets)
  • Theme Requirement: Divi Theme

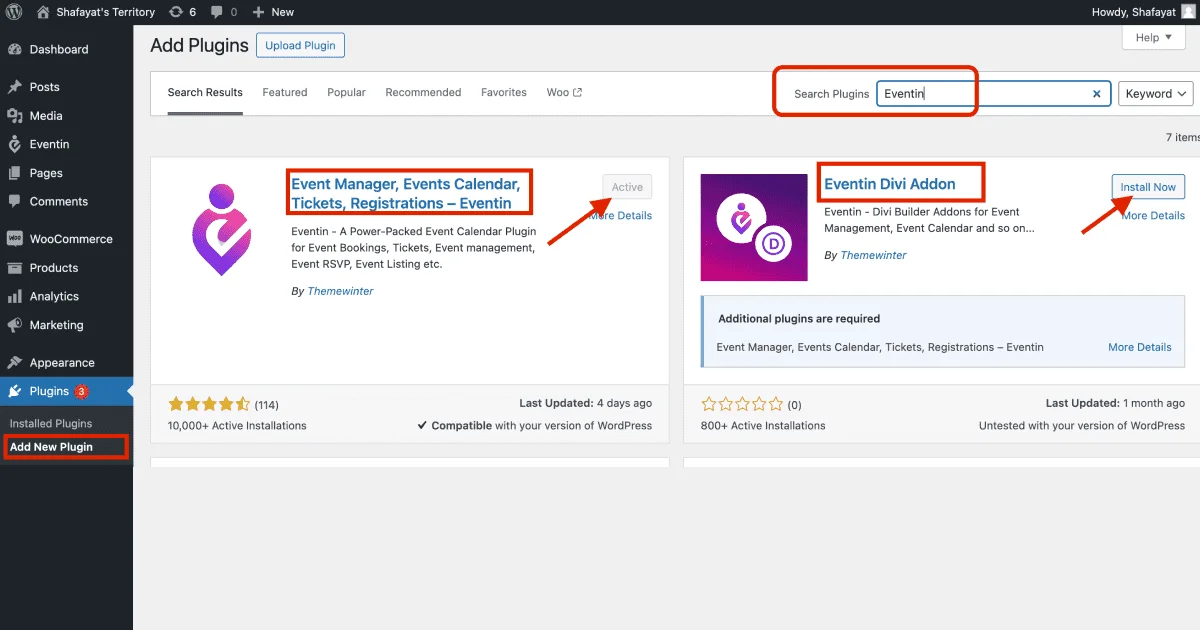
In order to install Eventin DIVI Addons, please log in to your WordPress dashboard and go to “Plugins” then “Add new”. After that search with “Eventin DIVI Addons”. You can see the Eventin Divi Addon developed by themewinter. Install and activate the addons.

Eventin Divi Addons

To install the plugin, click on the “Plugins” and then “Add New“. Then type Eventin in the upper right search plugins search box. After that click on “Install Now“. Wait a bit till installed then click on Activate.

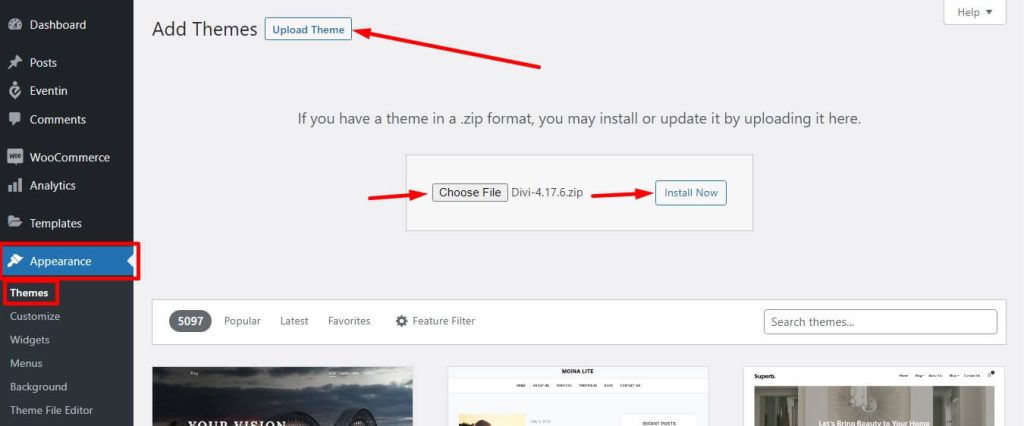
In order to install the theme, you need to go to “Appearance” then Themes and then “Add New“. You can see the theme uploading option. Select the theme file or drag and drop the themes. Finally, click on the “Install Now“.

After installing the theme, activate it from the “Active” button.

Divi Theme Installation

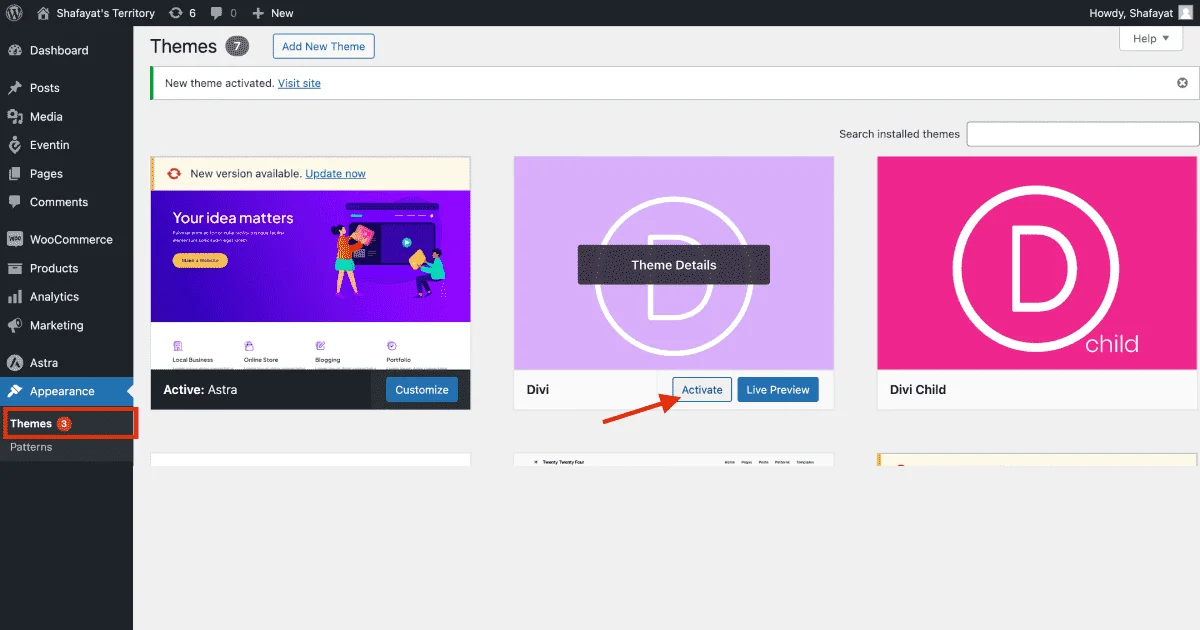
Once you have activated the theme and plugins, you are ready to go. Please choose a page on which you want to display events-related information. From the page list, click on “Edit With Divi”. Hold on a moment, and it will take you to the Divi editable page.

  • Settings key: Admin dashboard -> Pages -> Edit With Divi
Eventin Edit with Divi

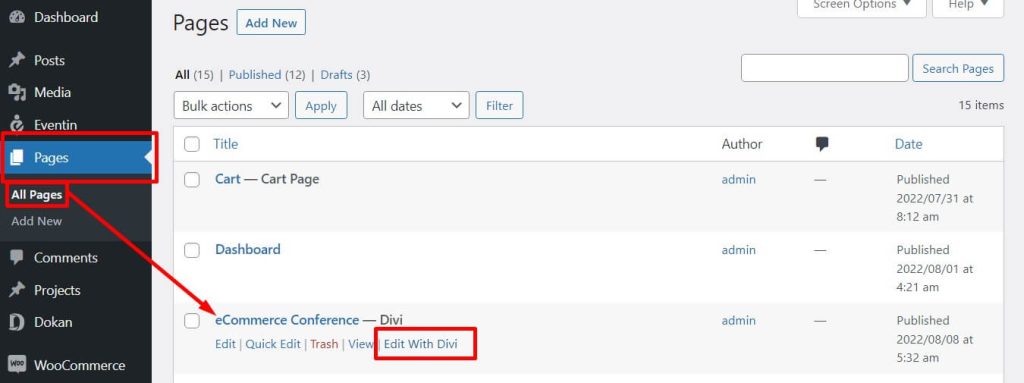
After clicking on the “Edit With Divi” you will redirect to the page divi editor and you can see the options for start the builder and editing. Please see the screenshot.

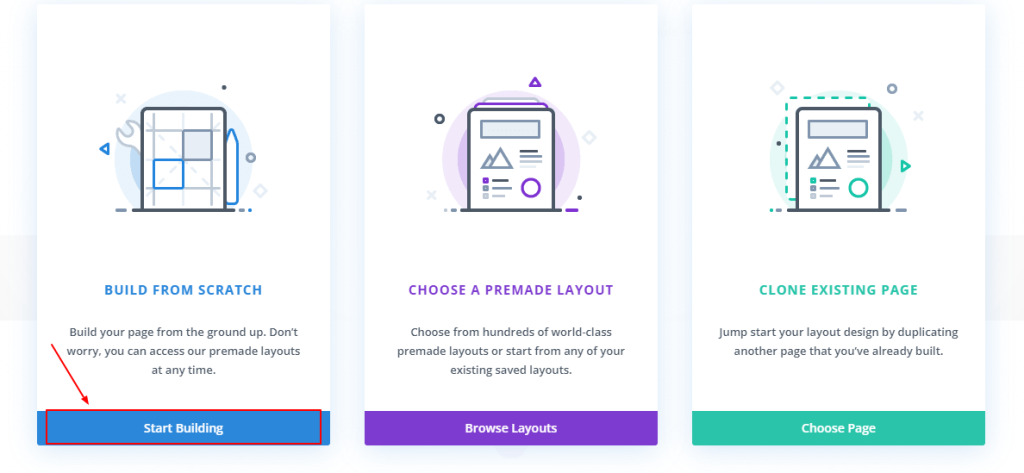
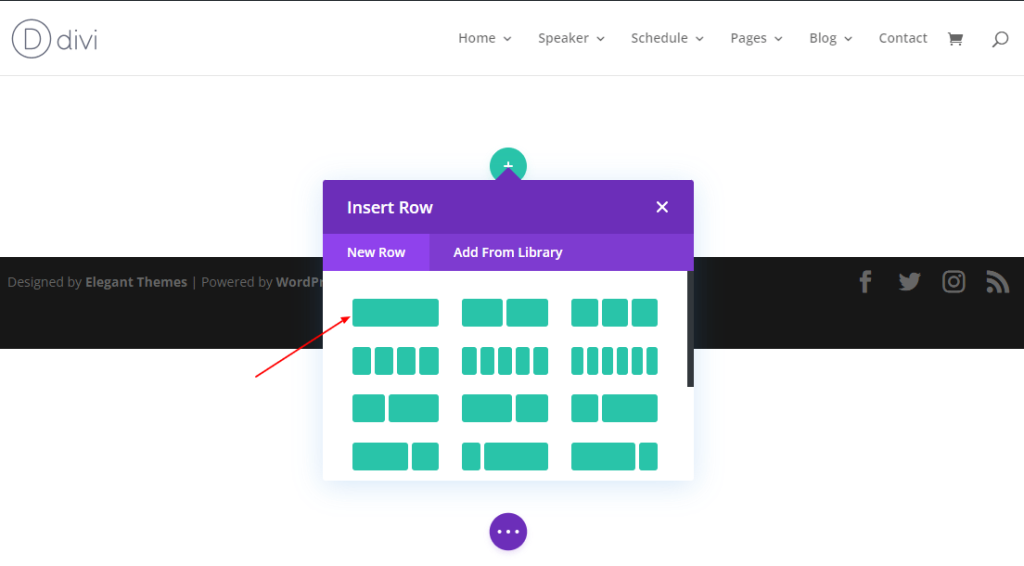
Click on the start building and then you will find the option to choose the row, you can select the row as you need.

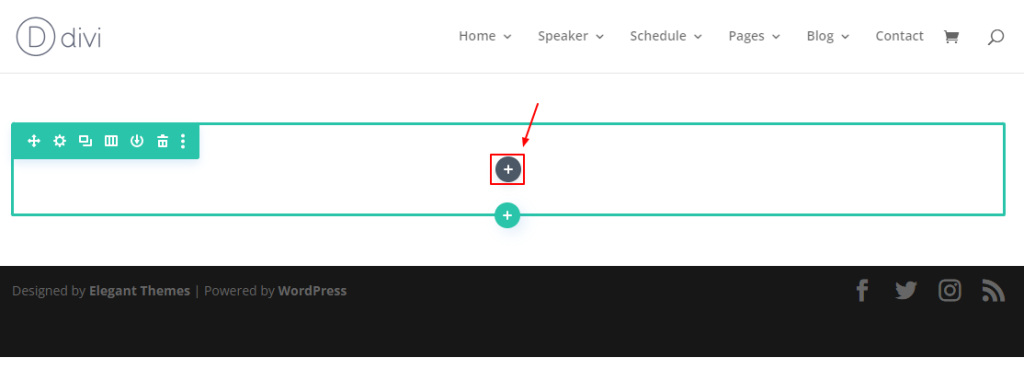
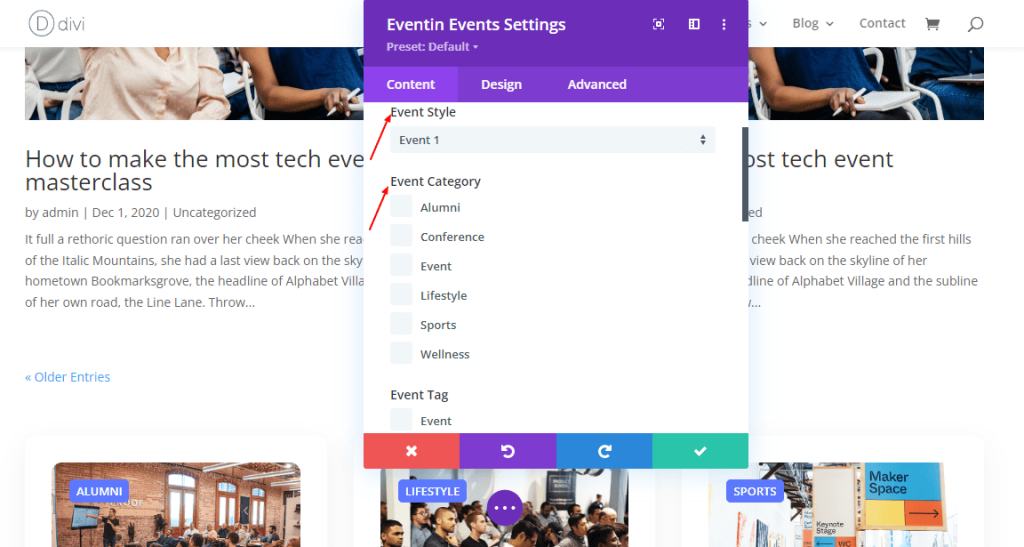
Inside the page, click on the plus(+) sign and insert the module. After that, search with the event keyword. All the eventin widgets will appear In the box.

Eventin Divi insert module

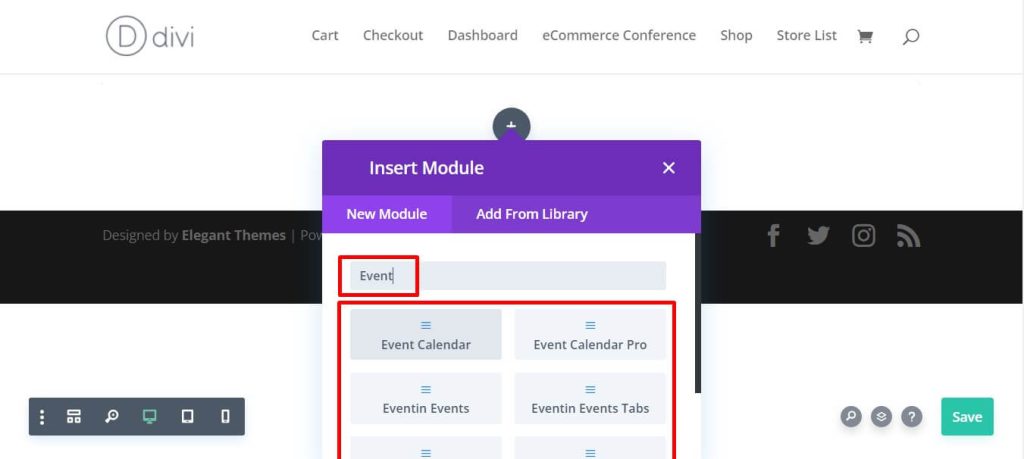
After selecting your specific event module you can see the options, you can choose these options as you required.

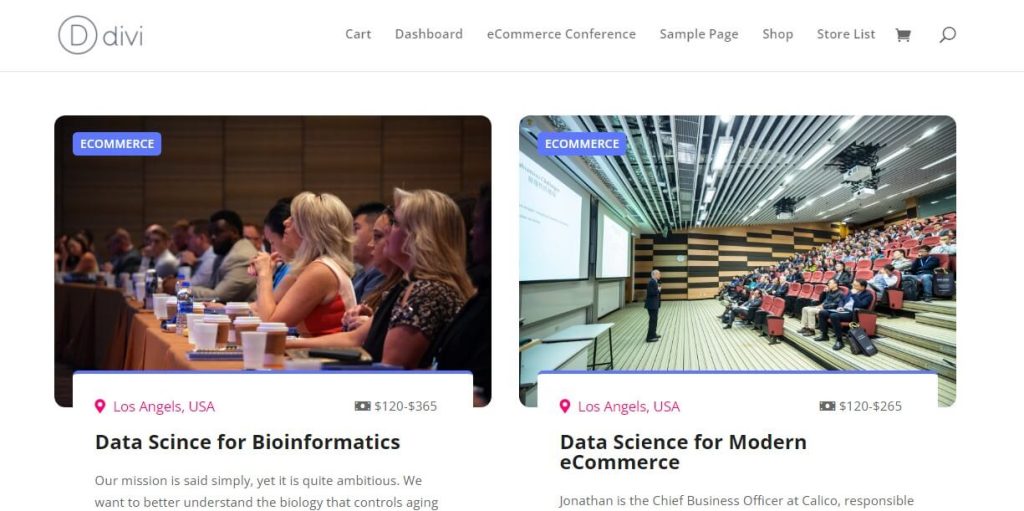
Add anything that you need, customize and save the changes. Done. Here is the sample output.

Eventin Divi Event Final Output

For more details please watch the video.

What are your Feelings
Share This Article :
  • Facebook
  • Twitter
  • LinkedIn
  • Pinterest
Updated on August 14, 2022
FluentCRM Integration
Copyright © 2023 Documentation for Plugins