Skip to content
Documentation for Plugins
  • Home
  • Support
  • Plugin Docs
Popular Search ticketemailqr codetranslatelocation

Eventin

Event
  • Single Event
  • Event Single Page with Elementor
  • Event Single Page with Oxygen Builder Using Shortcode
  • Event Attendee
  • Adding Attendees Manually(Pro)
  • Recurring Event
  • QR Code for Event Ticket Management(Pro)
  • WooCommerce Coupon for Events
  • Event Speaker & Organizer
  • Event location
  • Event Email Settings
  • Event Schedule
  • Front-end Event Submission (1st Phase)(Pro)
  • Multivendor Event Marketplace(Pro)
  • Certification for Attendee(Pro)
  • Embeddable Script(Pro)
  • Webhooks(Pro)
General Settings
  • General Settings
  • Plugin Installation
  • License
  • Purchaser Dashboard
  • User Roles and Permissions
  • Shortcodes
  • Min/Max Quantity Limit(Pro)
  • Registration and Ticket Selling
  • WooCommerce Deposits Extension Compatibility
  • Translation
  • Plugin Uninstallation
  • Get Support
Integration
  • Protected: Oxygen Builder Integration (Pro)
  • Bricks Builder Integration(Pro)
  • DIVI Builder Integration
  • FluentCRM Integration(pro)
  • Groundhogg Integration(Pro)
  • Calendar Integration (Google, Apple etc)
  • Pabbly Integration
  • Twilio SMS Integration
  • Zapier Integration
  • BuddyBoss Integration(Pro)
  • Zoom Module
  • Google Meet
Others Settings
  • Calendar View
Payment Type
  • WooCommerce
  • Stripe(Pro)
RSVP Settings
  • RSVP General Settings(Pro)
  • Single Event Settings
  • RSVP Invitations
Templates
  • Event Template Override
  • Speaker Template Override
  • Archive Page Override

WPCafe

  • Plugin Installation
  • WpCafe Shortcode
  • Multivendor Addon
  • Translation
  • WpCafe Elementor Widgets
  • Searching Products with Pickup/Delivery
  • Oxygen Builder Elements
  • User Roles and Permissions
  • Plugin Uninstallation
  • Theme Compatibility
  • Get Support
  • License
Delivery Module
  • General
  • Add Food Store’s Location at Google Map
  • Google autocomplete address in the checkout
  • Minimum order amount to place order
Food Ordering
  • General Settings For Location
  • Add New Food Menu
  • Food Ordering with QR code
  • Add Food Category and Tag
  • Minicart
  • Tipping
  • Discount
  • Special Menus
  • Live Order
  • Pickup
  • Delivery
  • Order Bumps
  • Product Addons
  • Product Addons for Vendor
General settings
  • General Settings for Date and Time
  • Slug Change
Integrations
  • FluentCRM Integration
  • Zapier Integration
  • Pabbly Integration
  • Food delivery ( Ship day ) plugin integration
  • Twilio SMS Integration
  • Thermal Printer Integration
  • WooCommerce Clover POS Integration
  • Loyalty Program Points & Rewards for Food Orders
Reservation
  • General Settings for Reservation
  • Form Customization
  • Notification Email
  • Schedule
  • Email Settings
  • Reservation with Food Ordering (PRO)
  • Visual Table Selection
Style Settings
  • Style Settings
WPCafe APP
  • Protected: App Settings
  • Protected: Delivery Time Update
  • Protected: Delivery Man
  • Home
  • Docs
  • WPCafe
  • Food Ordering
  • Product Addons

Product Addons

Table of Contents
    • Global Settings
    • Individual single product's addons settings
  • Product Addon Video Tutorial

Using WPCafe Product Addons, you can add more special options for your WooCommerce product.

You can add the product addons on the individual product or categories products (globally).

Global Settings #

You can apply addons options from single global settings. It will be applicable in all the products under selected category.

  • Navigate to Dashboard -> WPCafe -> Product Addons
  • Here you can see the Global settings options such as menu category and menu selection option, add new field for adding the product addons options.
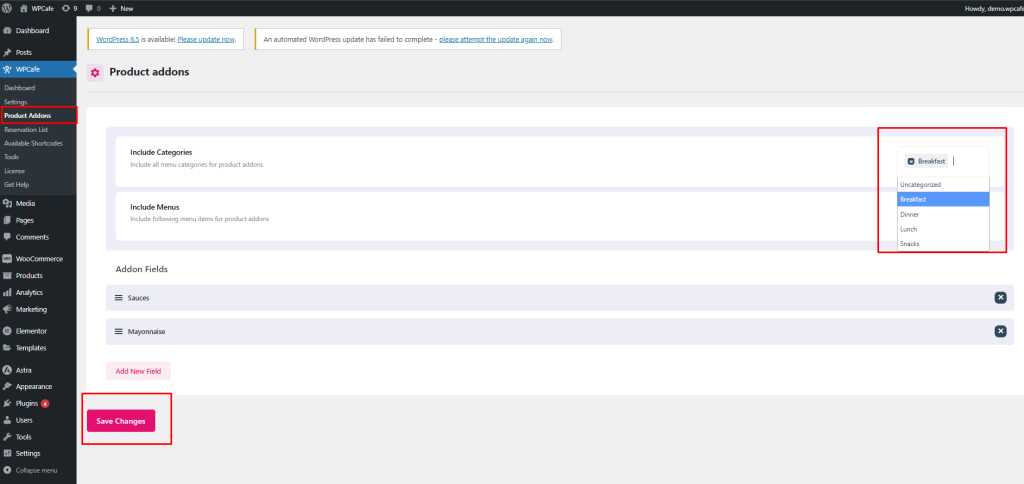
  • Now click on “Add New Field”.
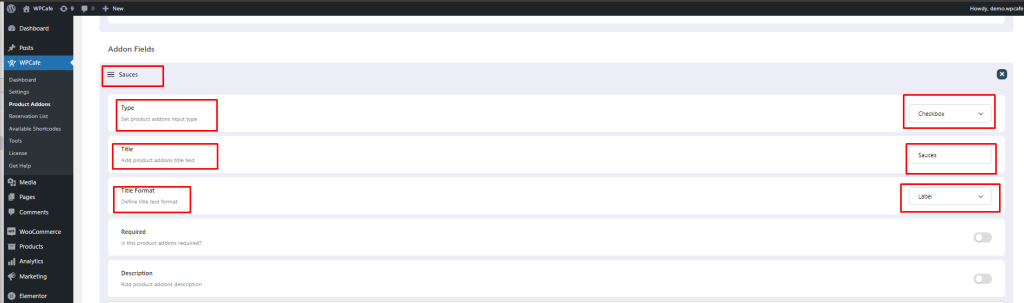
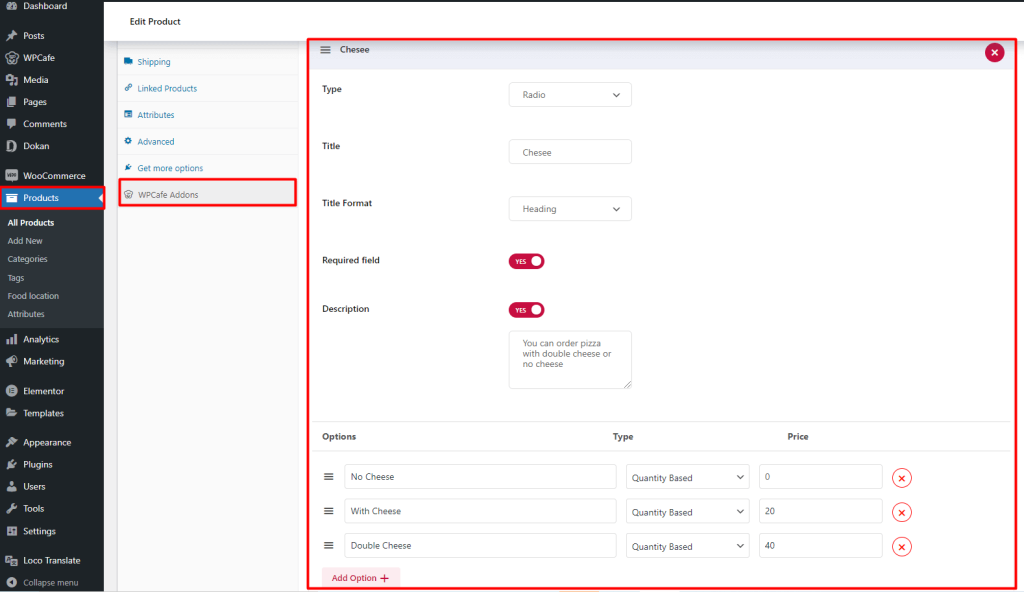
  • You can see all the available product addons options such as Type, Title and Title Format, Required Fields, Description and so on.

See the short description for this fields that you need to filled up.

Type: You can display the product options in different style such as Checkbox, Radio, Dropdown from Type fields.
Title: From Title field, you can add addons title for your product.
Title Format: Using title format, you can show your title as a label or heading and if you want, you can also hide it from here.
Required Fields: If required fields is enabled, the customer can’t add to cart the product without choosing the product addons.
Description: Description fields is used for product options description. You can add your product options description from here.

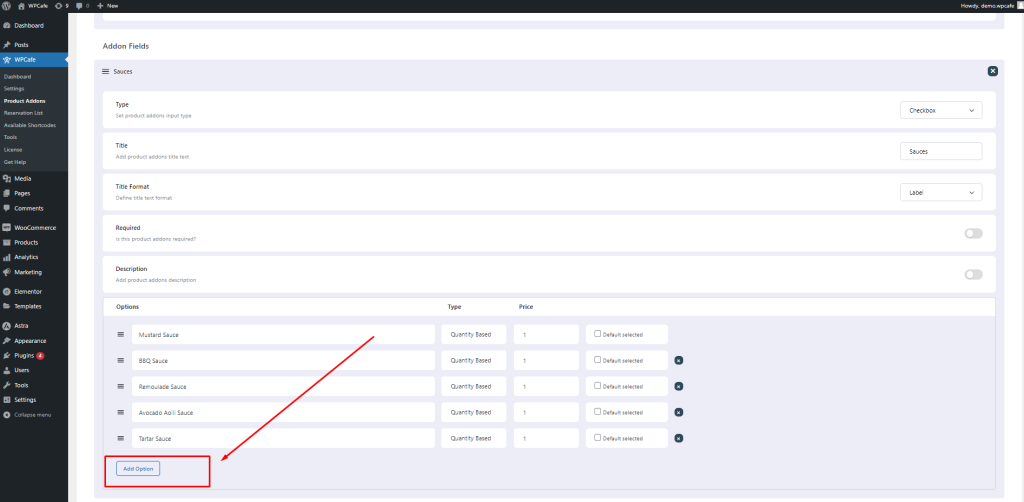
Add Options: In options field, there are 3 fileds for product addons options- Options, Type and Price. You can add the option name, option types and option price.


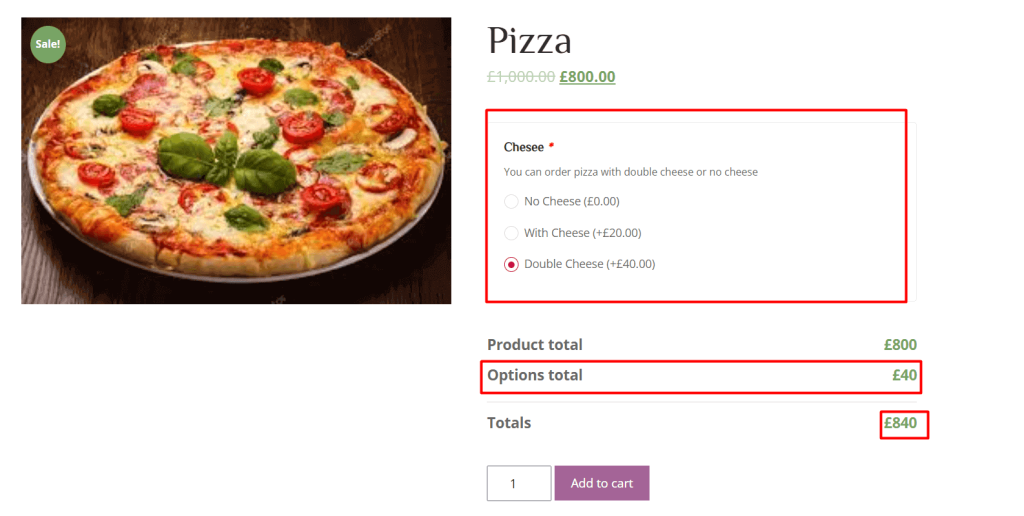
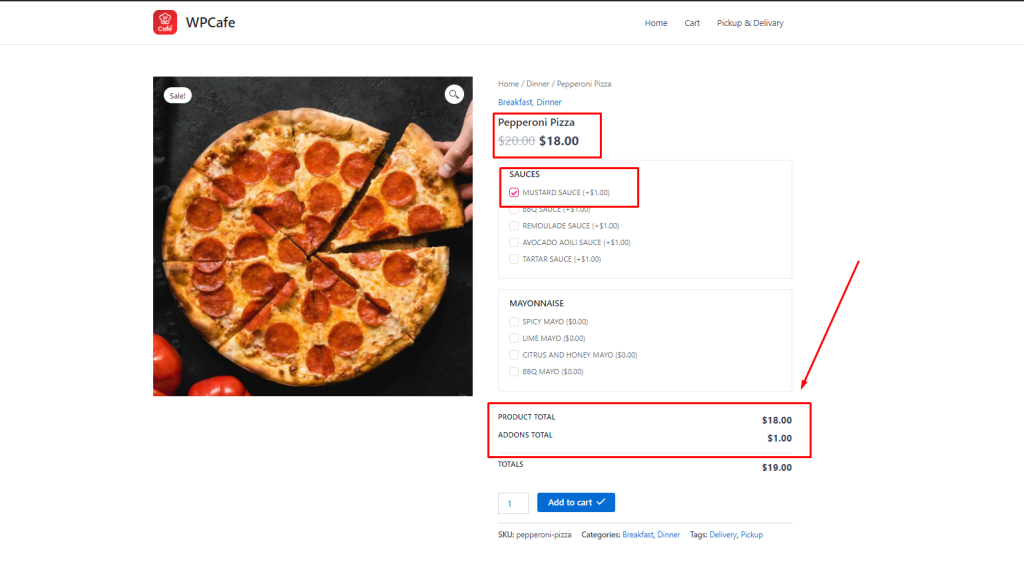
Front End view for the product addons:

You can also go for the globall settings from the single product page.

This image has an empty alt attribute; its file name is cafe-_productaddons_globalsettings-1024x444.png


Individual single product’s addons settings #


For adding product Addons for single product,

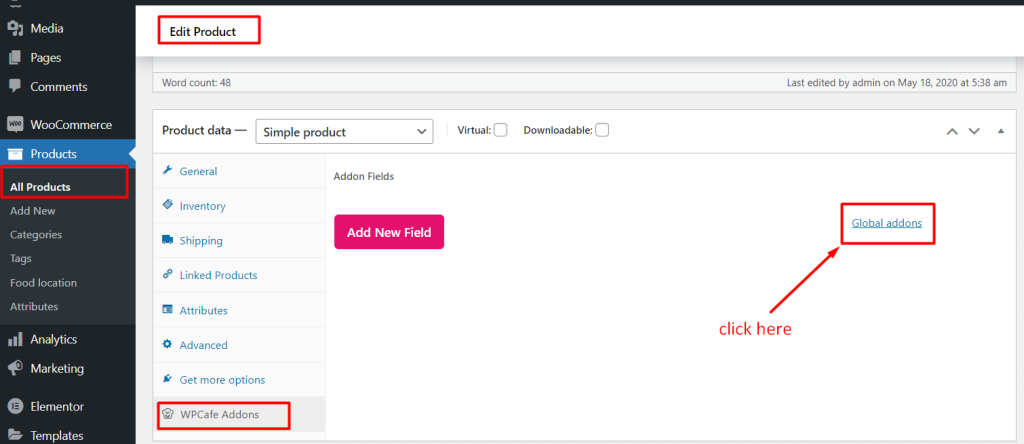
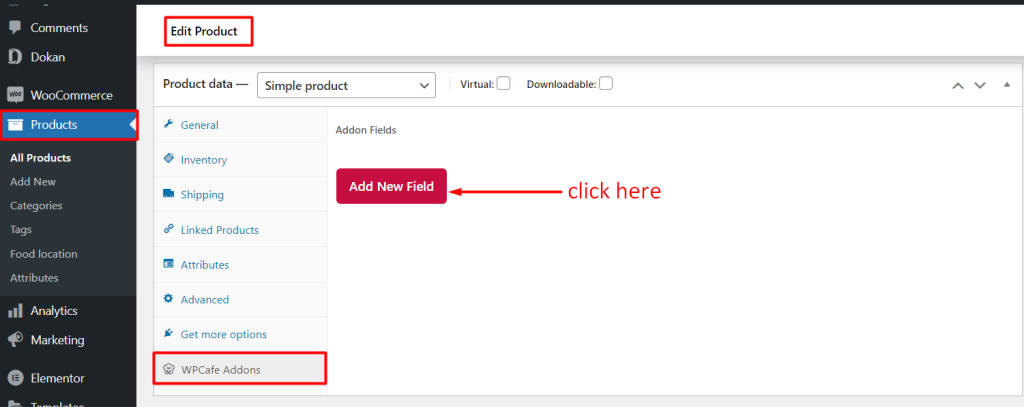
  • Navigate to Dashboard -> Products -> Add new/Edit on product -> WPCafe Addons.
  • Then click on “Add New Field”.

Now you can see all the available product addons options such as Type, Title and Title Format, Required Fields, Description and so on.

Frontend view for product addons:

Product Addon Video Tutorial #

What are your Feelings
Share This Article :
  • Facebook
  • Twitter
  • LinkedIn
  • Pinterest
Updated on January 12, 2022
Order BumpsProduct Addons for Vendor
Table of Contents
    • Global Settings
    • Individual single product's addons settings
  • Product Addon Video Tutorial
Copyright © 2023 Documentation for Plugins