Skip to content
Documentation for Plugins
  • Home
  • Support
  • Plugin Docs
Popular Search ticketemailqr codetranslatelocation

Eventin

Event
  • Single Event
  • Event Single Page with Elementor
  • Event Single Page with Oxygen Builder Using Shortcode
  • Event Attendee
  • Adding Attendees Manually(Pro)
  • Recurring Event
  • QR Code for Event Ticket Management(Pro)
  • WooCommerce Coupon for Events
  • Event Speaker & Organizer
  • Event location
  • Event Email Settings
  • Event Schedule
  • Front-end Event Submission (1st Phase)(Pro)
  • Multivendor Event Marketplace(Pro)
  • Certification for Attendee(Pro)
  • Embeddable Script(Pro)
  • Webhooks(Pro)
General Settings
  • General Settings
  • Plugin Installation
  • License
  • Purchaser Dashboard
  • User Roles and Permissions
  • Shortcodes
  • Min/Max Quantity Limit(Pro)
  • Registration and Ticket Selling
  • WooCommerce Deposits Extension Compatibility
  • Translation
  • Plugin Uninstallation
  • Get Support
Integration
  • Protected: Oxygen Builder Integration (Pro)
  • Bricks Builder Integration(Pro)
  • DIVI Builder Integration
  • FluentCRM Integration(pro)
  • Groundhogg Integration(Pro)
  • Calendar Integration (Google, Apple etc)
  • Pabbly Integration
  • Twilio SMS Integration
  • Zapier Integration
  • BuddyBoss Integration(Pro)
  • Zoom Module
  • Google Meet
Others Settings
  • Calendar View
Payment Type
  • WooCommerce
  • Stripe(Pro)
RSVP Settings
  • RSVP General Settings(Pro)
  • Single Event Settings
  • RSVP Invitations
Templates
  • Event Template Override
  • Speaker Template Override
  • Archive Page Override

WPCafe

  • Plugin Installation
  • WpCafe Shortcode
  • Multivendor Addon
  • Translation
  • WpCafe Elementor Widgets
  • Searching Products with Pickup/Delivery
  • Oxygen Builder Elements
  • User Roles and Permissions
  • Plugin Uninstallation
  • Theme Compatibility
  • Get Support
  • License
Delivery Module
  • General
  • Add Food Store’s Location at Google Map
  • Google autocomplete address in the checkout
  • Minimum order amount to place order
Food Ordering
  • General Settings For Location
  • Add New Food Menu
  • Food Ordering with QR code
  • Add Food Category and Tag
  • Minicart
  • Tipping
  • Discount
  • Special Menus
  • Live Order
  • Pickup
  • Delivery
  • Order Bumps
  • Product Addons
  • Product Addons for Vendor
General settings
  • General Settings for Date and Time
  • Slug Change
Integrations
  • FluentCRM Integration
  • Zapier Integration
  • Pabbly Integration
  • Food delivery ( Ship day ) plugin integration
  • Twilio SMS Integration
  • Thermal Printer Integration
  • WooCommerce Clover POS Integration
  • Loyalty Program Points & Rewards for Food Orders
Reservation
  • General Settings for Reservation
  • Form Customization
  • Notification Email
  • Schedule
  • Email Settings
  • Reservation with Food Ordering (PRO)
  • Visual Table Selection
Style Settings
  • Style Settings
WPCafe APP
  • Protected: App Settings
  • Protected: Delivery Time Update
  • Protected: Delivery Man
  • Home
  • Docs
  • WPCafe
  • Integrations
  • Thermal Printer Integration

Thermal Printer Integration

You can integrate “Thermal printer” in WPCafe to automate the food ordering cash-slip printing. You can integrate “Thermal printer” with the “Star CloudPRNT for WooCommerce” plugin. If you integrate, you will get the following advantage.

  • Print automated receipts
  • Quickly create a remote receipt for each order
  • Customize the information and message before print the receipts
  • Connected printers anywhere in the world to print the receipts

Required Plugin – Star CloudPRNT for WooCommerce
Important Note – WPCafe supports a “Thermal printer” for “Food Ordering” only.
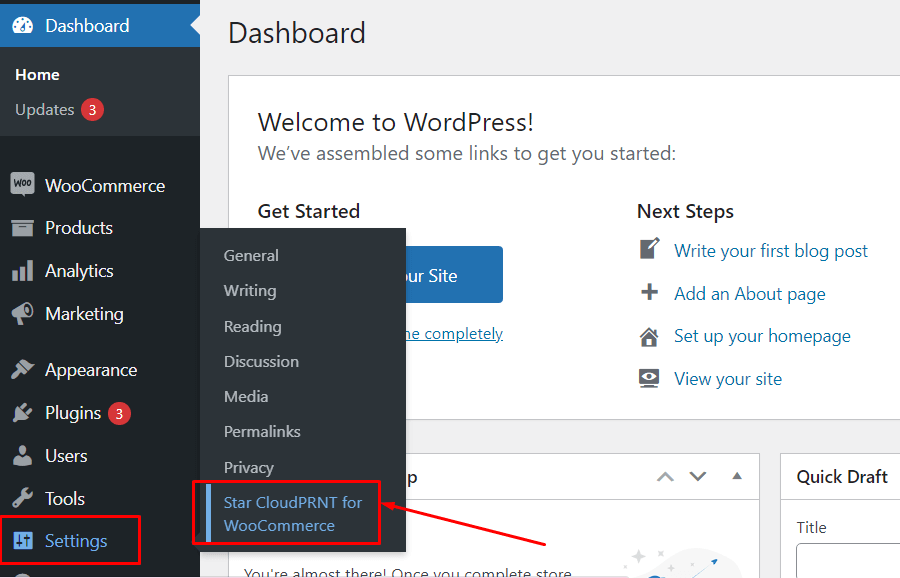
Step 01
Download and Install the “Star CloudPRNT for WooCommerce” plugin.

Login to your WordPress dashboard and go to ‘Plugins’ then ‘Add new’ from the left sidebar menu. After that search with ‘Star CloudPRNT for WooCommerce’ and you will see the plugin. Install and activate the plugin.
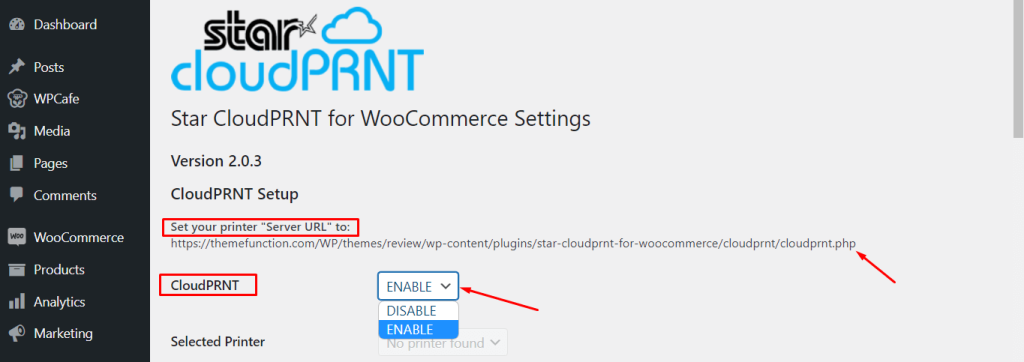
Star CloudPRNT for WooCommerce Plugin

Step 02
Collect your printer “Server URL”

The printer server URL is the most important element to connect your WooCommerce with a thermal printer. In order to collect it, go to settings then “Star CloudPRNT for WooCommerce”. You will see the server URL. Copy the URL and save it for future use.

Star CloudPRNT for WooCommerce Settings

Note– Don’t forget to set the ‘CloudPRNT’ option as Enable before saving the changes.
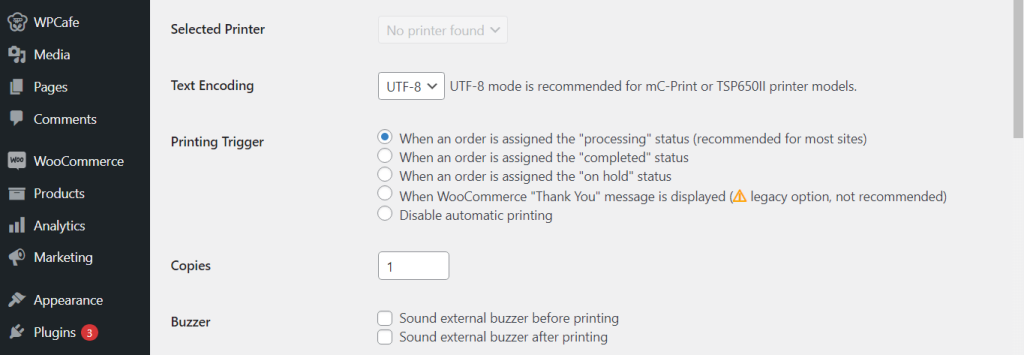
Step 03
There are other general settings that you can modify and utilize based on your needs. Here is the description and explanation of the available options.

Selected Printer – Select which printer you will use for printing the receipt.
Text Encoding – Select your text encoding formate from here.
Printing Trigger – Select when you want to print the receipt.
Copies – You can print one or multiple copies of the receipt.
Buzzer – You can set the sound notifications settings.

Star CloudPRNT for WooCommerce General Settings

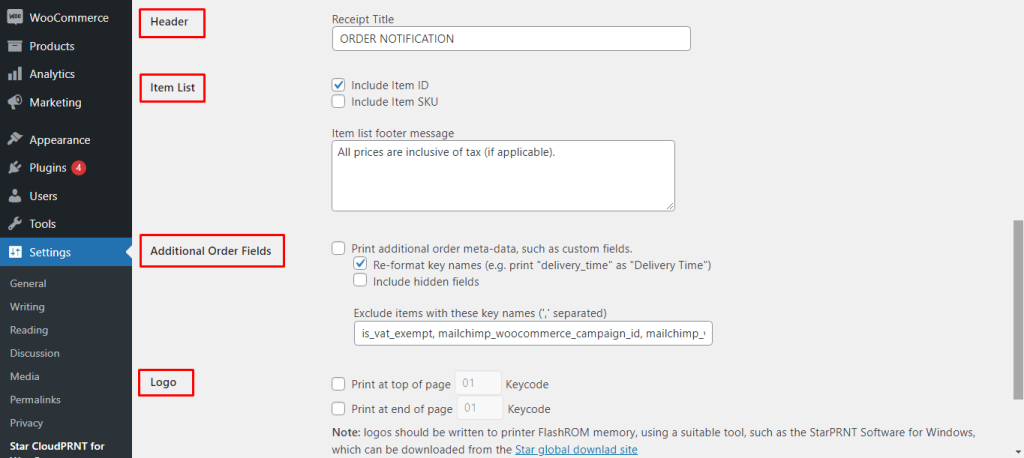
Header – ‘Receipt Title’ that will be added top of the receipt.
Item List – You can add items list both SKU and ID in the receipt.
Additional Order Fields – You can print additional order meta from this option.
Logo – You can add a logo from here.

Star CloudPRNT for WooCommerce Settings-2

Important – You can integrate Thermal printer with the “Print Manager for WooCommerce” plugin. All the steps will be similar to “Star CloudPRNT for WooCommerce”.

What are your Feelings
Share This Article :
  • Facebook
  • Twitter
  • LinkedIn
  • Pinterest
Updated on April 27, 2022
Twilio SMS IntegrationWooCommerce Clover POS Integration
Copyright © 2023 Documentation for Plugins