Skip to content
Documentation for Plugins
  • Home
  • Support
  • Plugin Docs
Popular Search ticketemailqr codetranslatelocation

Eventin

Event
  • Single Event
  • Event Single Page with Elementor
  • Event Single Page with Oxygen Builder Using Shortcode
  • Event Attendee
  • Adding Attendees Manually(Pro)
  • Recurring Event
  • QR Code for Event Ticket Management(Pro)
  • WooCommerce Coupon for Events
  • Event Speaker & Organizer
  • Event location
  • Event Email Settings
  • Event Schedule
  • Front-end Event Submission (1st Phase)(Pro)
  • Multivendor Event Marketplace(Pro)
  • Certification for Attendee(Pro)
  • Embeddable Script(Pro)
  • Webhooks(Pro)
General Settings
  • General Settings
  • Plugin Installation
  • License
  • Purchaser Dashboard
  • User Roles and Permissions
  • Shortcodes
  • Min/Max Quantity Limit(Pro)
  • Registration and Ticket Selling
  • WooCommerce Deposits Extension Compatibility
  • Translation
  • Plugin Uninstallation
  • Get Support
Integration
  • Protected: Oxygen Builder Integration (Pro)
  • Bricks Builder Integration(Pro)
  • DIVI Builder Integration
  • FluentCRM Integration(pro)
  • Groundhogg Integration(Pro)
  • Calendar Integration (Google, Apple etc)
  • Pabbly Integration
  • Twilio SMS Integration
  • Zapier Integration
  • BuddyBoss Integration(Pro)
  • Zoom Module
  • Google Meet
Others Settings
  • Calendar View
Payment Type
  • WooCommerce
  • Stripe(Pro)
RSVP Settings
  • RSVP General Settings(Pro)
  • Single Event Settings
  • RSVP Invitations
Templates
  • Event Template Override
  • Speaker Template Override
  • Archive Page Override

WPCafe

  • Plugin Installation
  • WpCafe Shortcode
  • Multivendor Addon
  • Translation
  • WpCafe Elementor Widgets
  • Searching Products with Pickup/Delivery
  • Oxygen Builder Elements
  • User Roles and Permissions
  • Plugin Uninstallation
  • Theme Compatibility
  • Get Support
  • License
Delivery Module
  • General
  • Add Food Store’s Location at Google Map
  • Google autocomplete address in the checkout
  • Minimum order amount to place order
Food Ordering
  • General Settings For Location
  • Add New Food Menu
  • Food Ordering with QR code
  • Add Food Category and Tag
  • Minicart
  • Tipping
  • Discount
  • Special Menus
  • Live Order
  • Pickup
  • Delivery
  • Order Bumps
  • Product Addons
  • Product Addons for Vendor
General settings
  • General Settings for Date and Time
  • Slug Change
Integrations
  • FluentCRM Integration
  • Zapier Integration
  • Pabbly Integration
  • Food delivery ( Ship day ) plugin integration
  • Twilio SMS Integration
  • Thermal Printer Integration
  • WooCommerce Clover POS Integration
  • Loyalty Program Points & Rewards for Food Orders
Reservation
  • General Settings for Reservation
  • Form Customization
  • Notification Email
  • Schedule
  • Email Settings
  • Reservation with Food Ordering (PRO)
  • Visual Table Selection
Style Settings
  • Style Settings
WPCafe APP
  • Protected: App Settings
  • Protected: Delivery Time Update
  • Protected: Delivery Man
  • Home
  • Docs
  • WPCafe
  • Integrations
  • Food delivery ( Ship day ) plugin integration

Food delivery ( Ship day ) plugin integration

Table of Contents
  • Shipday FAQs and APP setup

The WPCafe plugin is fully compatible with the plugin ‘Local Delivery App for WooCommerce by Shipday’. Shipday is ideal for managing fast on-demand or scheduled deliveries for your online business. As WPCafe has an option to set pickup/delivery, you can easily set up your delivery man using this plugin and deliver your orders.

  • Shipday plugin
  • WPCafe plugin documentation

Shipday plugin integration will provide you with the following service on your website.

  • Real-time driver location tracking
  • Automated and manual order input
  • Identify the best delivery route
  • Manage both on-demand and scheduled orders

In order to set Shipday plugin, please log in to your WordPress site and go to plugin and click on add new. Then search with ‘Local Delivery App for WooCommerce by Shipday’ then install the plugin.

After successfully installing the plugin these will be your following steps:

  • Go to the admin panel then click on the WooCommerce option on the left side bar. 
  • You’ll find the settings option under the WooCommerce option.
  • You’ll find several tabs in the top and click the tab named Shipday.

Settings Key: Dashboard -> WooCommerce -> Settings -> Shipday

Now you need an API key to add to the Shipday settings panel.

  • Login to your shipday account to get the Shipday API key. It’s in the following, My Account -> Profile -> API key . If you are new, you will need to create an account firts.
  • Fill other fields of the form. Be careful about the “Pickup Address”. It needs a google map friendly street address with street number, city and country name. If the address is not readable on google map, the pick up address may not show up. Once you are hap[p[y with the address, save the form.
  • After creating the REST API key, copy the consumer key and consumer secret, go back to ship day settings and set up these keys. Then click save changes. That’s it.

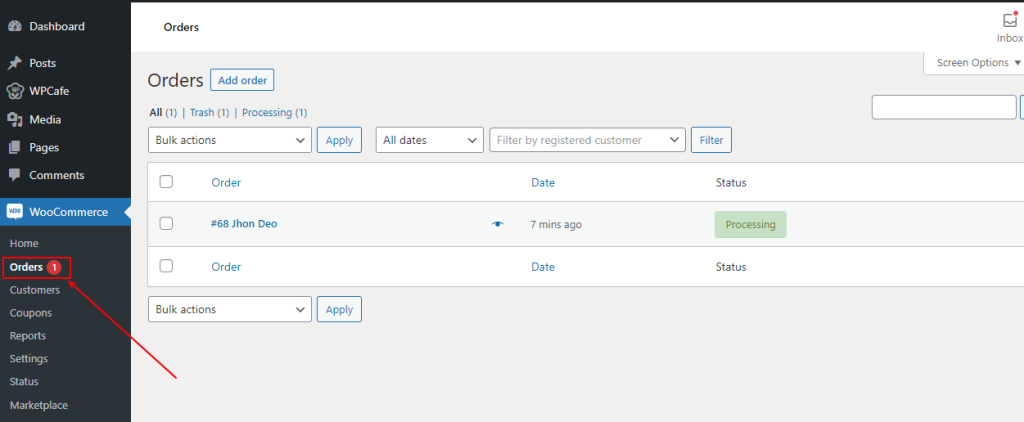
Now, for every new order on your WooCommerce site, it will also appear on your Shipday dispatch dashboard. See the sample order on your WooCommerce site.

See the same order in the Shipday dispatch dashboard. You can assign a driver/delivery man who will pick up the order and delivery it to the user’s address.

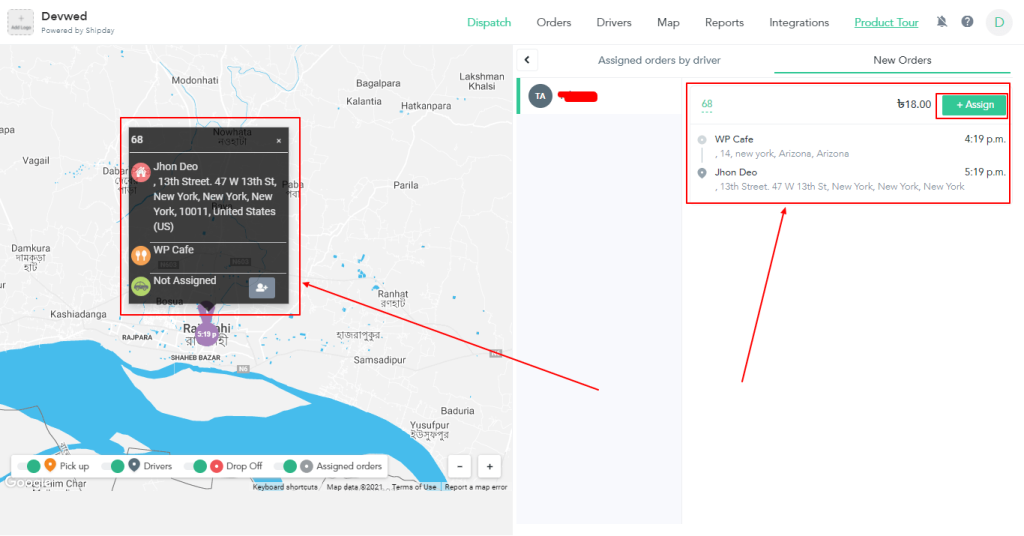
After seeing the order in your Shipday dispatch dashboard, the admin will assign a driver/delivery man to pick the order from the admin address and delivery it to the specified address. The admin can add drivers/delivery men as many as possible.

Shipday FAQs and APP setup #

Please visit the FAQs page here for all the common questions you may have. And for Shipday driver/delivery man App setting up visit the official docs here.

What are your Feelings
Share This Article :
  • Facebook
  • Twitter
  • LinkedIn
  • Pinterest
Updated on April 27, 2022
Pabbly IntegrationTwilio SMS Integration
Table of Contents
  • Shipday FAQs and APP setup
Copyright © 2023 Documentation for Plugins