Skip to content
Documentation for Plugins
  • Home
  • Support
  • Plugin Docs
Popular Search ticketemailqr codetranslatelocation

Eventin

Event
  • Single Event
  • Event Single Page with Elementor
  • Event Single Page with Oxygen Builder Using Shortcode
  • Event Attendee
  • Adding Attendees Manually(Pro)
  • Recurring Event
  • QR Code for Event Ticket Management(Pro)
  • WooCommerce Coupon for Events
  • Event Speaker & Organizer
  • Event location
  • Event Email Settings
  • Event Schedule
  • Front-end Event Submission (1st Phase)(Pro)
  • Multivendor Event Marketplace(Pro)
  • Certification for Attendee(Pro)
  • Embeddable Script(Pro)
  • Webhooks(Pro)
General Settings
  • General Settings
  • Plugin Installation
  • License
  • Purchaser Dashboard
  • User Roles and Permissions
  • Shortcodes
  • Min/Max Quantity Limit(Pro)
  • Registration and Ticket Selling
  • WooCommerce Deposits Extension Compatibility
  • Translation
  • Plugin Uninstallation
  • Get Support
Integration
  • Oxygen Builder Integration (Pro)
  • Bricks Builder Integration(Pro)
  • DIVI Builder Integration
  • FluentCRM Integration(pro)
  • Groundhogg Integration(Pro)
  • Calendar Integration (Google, Apple etc)
  • Pabbly Integration
  • Twilio SMS Integration
  • Zapier Integration
  • BuddyBoss Integration(Pro)
  • Zoom Module
  • Google Meet(Pro)
Others Settings
  • Calendar View
Payment Type
  • WooCommerce
  • Stripe(Pro)
RSVP Settings(Pro)
  • RSVP General Settings(Pro)
  • Single Event Settings
  • RSVP Invitations
Templates
  • Event Template Override
  • Speaker Template Override
  • Archive Page Override
Visual Seat Map
  • Visual Seat Map

WPCafe

  • Plugin Installation
  • WpCafe Shortcode
  • Multivendor Addon
  • Translation
  • WpCafe Elementor Widgets
  • Searching Products with Pickup/Delivery(Pro)
  • Oxygen Builder Elements
  • User Roles and Permissions
  • Plugin Uninstallation
  • Theme Compatibility
  • Get Support
  • License
Delivery Module(Pro)
  • General
  • Add Food Store’s Location on Google Map(Pro)
  • Google autocomplete address in the checkout(Pro)
  • Minimum order amount to place order(Pro)
Food Ordering
  • General Settings For Location
  • Add New Food Menu
  • Food Ordering with QR code(Pro)
  • Add Food Category and Tag
  • Minicart
  • Tipping (Pro)
  • Discount(Pro)
  • Special Menus(Pro)
  • Live Order(Pro)
  • Pickup (Pro)
  • Delivery (Pro)
  • Order Bumps
  • Product Addons (Pro)
  • Product Addons for Vendor (Pro)
General settings
  • General Settings for Date and Time
  • Slug Change
Integrations
  • FluentCRM Integration
  • Zapier Integration
  • Pabbly Integration
  • Food delivery ( Ship day ) plugin integration
  • Twilio SMS Integration
  • Thermal Printer Integration
  • WooCommerce Clover POS Integration
  • Loyalty Program Points & Rewards for Food Orders
Reservation
  • General Settings for Reservation
  • Form Customization
  • Notification Email
  • Schedule
  • Email Settings
  • Reservation with Food Ordering (PRO)
  • Visual Table Selection
Style Settings
  • Style Settings
WPCafe APP
  • Protected: App Settings
  • Protected: Delivery Time Update
  • Protected: Delivery Man
  • Home
  • Docs
  • Eventin
  • General Settings
  • Min/Max Quantity Limit(Pro)

Min/Max Quantity Limit(Pro)

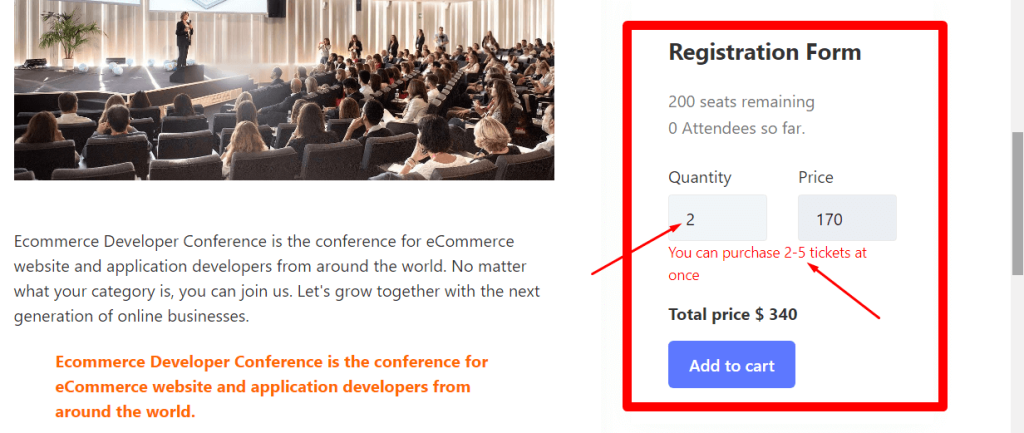
You can control minimum and maximum ticket purchases on Eventin. This feature is helpful for protecting against fraud ticketing. Now you can set minimum and maximum ticket purchases for every single checkout. It means any ticket purchaser can buy tickets from a pre-defined range(between minimum-maximum) each time they try to purchase.
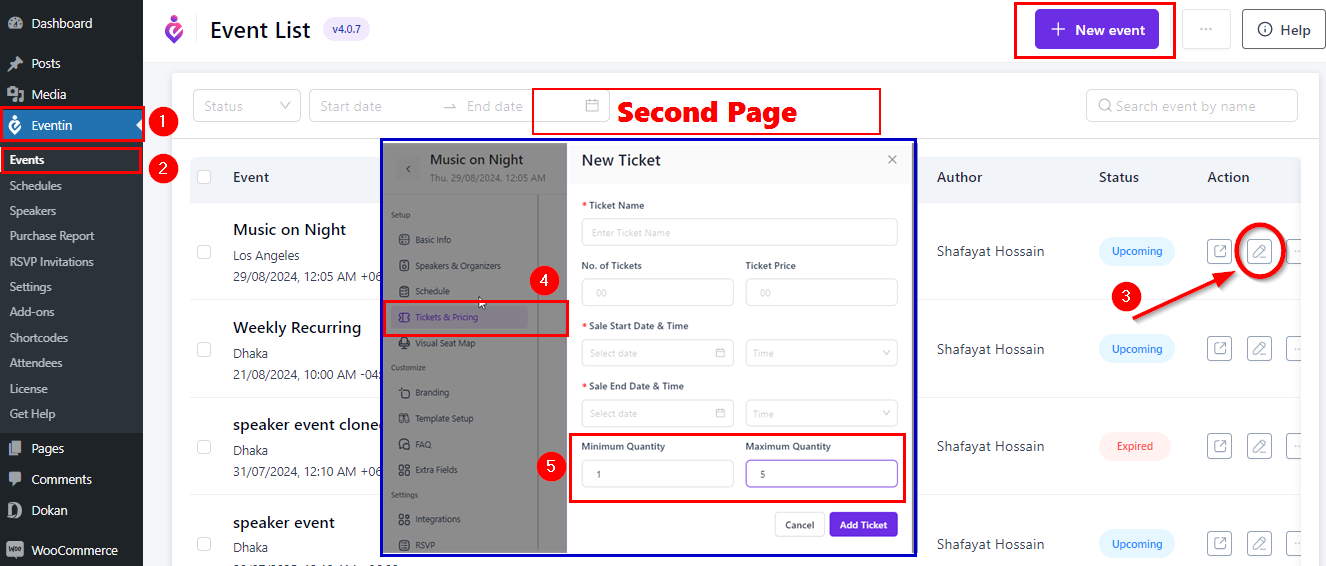
Set Minimum Ticket Quantity: In order to set the minimum ticket purchase for each time, log in to WP Eventin from the WordPress dashboard. After that, go to the event and click on the edit option. Scroll down and you will get the minimum quantity input filed. Note- If you do not set a minimum quantity, then it will be one(01) by default.

  • Settings Key: Eventin -> Events -> Edit -> Ticket & Pricing -> Minimum Order Qty -> Update

Set Maximum Ticket Quantity: In order to set the maximum ticket purchase for each time, log in to WP Eventin from the WordPress dashboard. After that, go to events and click on the edit option. Scroll down and you will get the maximum quantity input field. Note- If you do not set the maximum quantity, then the ‘maximum ticket quantity’ will be the ‘10,000’ of that event by default.

  • Settings Key: Eventin -> Events -> Edit -> Ticket & Pricing -> Maximum Order Qty -> Update

min-max-quantity

Front-end View of Minimum and Maximum Ticket Purchasing:

WP Eventin Min Max Ticketing front end

Note: We are hoping to update the control of minimum and maximum tickets based on the user’s email soon.

What are your Feelings
Share This Article :
  • Facebook
  • Twitter
  • LinkedIn
  • Pinterest
Updated on February 26, 2023
ShortcodesRegistration and Ticket Selling
Copyright © 2023 Documentation for Plugins